Seven Day B&W Photo Challenge – Day 3

I was invited by Elizabeth at tea & paper to join the Seven Day B&W Photo Challenge. (Thanks, Elizabeth.)

Rules are
• Seven days.
• Seven black and white photos of your life.
• No people.
• No explanation.
• Challenge someone new each day.

Today I would like to challenge Paulo from Balance.

Posted in photo | Tagged | 4 Comments

Seven Day B&W Photo Challenge – Day 2

I was invited by Elizabeth at tea & paper to join the Seven Day B&W Photo Challenge. (Thanks, Elizabeth.)

Rules are
• Seven days.
• Seven black and white photos of your life.
• No people.
• No explanation.
• Challenge someone new each day.

Today I would like to challenge Amy from The World is A Book

Posted in photo | Tagged | 8 Comments

Seven Day B&W Photo Challenge – Day 1

I was invited by Elizabeth at tea & paper to join the Seven Day B&W Photo Challenge. (Thanks, Elizabeth.)

Rules are
• Seven days.
• Seven black and white photos of your life.
• No people.
• No explanation.
• Challenge someone new each day

Today I would like to challenge Raj from XDrive.

Thanks for visiting my blog.

Posted in photo | Tagged | 18 Comments

XDrive Photo Lesson 11 – Lenses (Part 3)

This is my third post for XDrive Photo Lesson 11 – Lenses. 😉

Another post for Lenses? For me, there is one more question that I would like to know the answer, and that is if I take the same photo with two different lenses, how similar or different they would look. Of course, if I want a good comparison, I should take one photo right after the other and I should use a tripod. But since my purpose was to see the difference in photo quality (and to satisfy my curiosity), I think it is okay that I took them on different days.

The first two photos were taken at F/14, 50 mm focal length. First one with 50 mm lens, and the second one with 28-300 mm lens.

50 MM lens: (F/14, 1/25 Sec., ISO-800, 50 mm)

28-300 lens: (F/14, 1/13 Sec., ISO-100, 50 mm)

It was pretty bright. I didn’t realize the second photo took 1/13 sec. 😉

The next two photos were taken at F/5.6, 28 mm focal length. First one with 16-28 mm lens, and the second one with 28-300 mm lens.

16-24 mm wide angle lens: (F/5.6, 1/160 Sec., ISO-200, 28 mm. )

28-300 mm zoom lens: (F/5.6, 1/125 Sec., ISO-100, 28 mm. )

I think 28-300 mm lens is not too bad, don’t you agree?

This is the end of experimenting lenses (for lesson 11), I promise 😉

Thanks for visiting my blog.

Posted in photo, photo and thoughts | Tagged | 9 Comments

XDrive Photo Lesson 11 – Lenses (Part 2)

This is my second submission for XDrive Photo Lesson 11 – Lenses. All photos were taken with Nikon D750.

I took our 16-28 mm lens to Douglas Trail today. It didn’t take me long to see why many photographers don’t mind carrying this heavy thing around.

My first try…


(F/5.6, 1/800 Sec., ISO-200, 16 mm)

I probably should use a bigger F-stop, so the background would be clearer… yes?

Why 16 mm, you may wonder. Well, I had to start somewhere. Why it is darker in the middle of the foreground? Well, I accidentally shot my own shadow, that is. ;-(

After seeing the first photo, I got excited. 😉


(F/5.6, 1/80 Sec., ISO-200, 16 mm.)


(F/5.6, 1/30 Sec., ISO-200, 16 mm.)


(F/5.6, 1/160 Sec., ISO-200, 28 mm. )

Now I understand why one 28-300 mm lens is not enough. Does this mean I can no longer be a happy one-lens person anymore?

What has Raj done to me? ;-(

Thanks for visiting my blog.

Posted in photo, photo and thoughts | Tagged | 17 Comments

XDrive Photo Lesson 11 – Lenses

This is my submission for XDrive Photo Lesson 11 – Lenses. All photos were taken with Nikon D750.

I was very surprised when I found out the subject of Lesson 11. I am a one-lens person. It used to be 24-120 mm (F4), but about 6 months ago, I started using 28-300 mm (F3.5 – F5.6), because I like to be able to zoom-in more. I admit that once in a long while I did wish to have a macro or wilder lens in hand so I could catch what I wanted to catch, but even at those moments, I was okay not having them, because I really didn’t want to carry an extra lens.

So, my first thought was to take a couple of photos using my dependable 28-300 for this lesson and posted them. But the more I thought about this, the more I like the idea of trying something new. Finally, I humbly asked my husband how many lenses we have. (Remember I didn’t even realize we had a macro lens? 😉

It turns out that other than the two I have mentioned above, and the macro, we have 4. (I was shock!) It would take me a month to try them all! I quickly narrowed down to two: 50 mm (F1.4) and 16-24 mm (F4.0). But it turned out that I didn’t even have time to try two. So, 50 mm it is.

I started shooting indoor. First photo was taken with 28-300 mm lens, and the second with 50 mm.


(F7.1, 1/50 sec., ISO-1250, 135mm – 28-300 mm lens)


(F7.1, 1/30 sec., ISO-1250, 50 mm – 50 mm lens)

I was surprised at how different they looked. The light in 50 mm seems softer. Am I right?

I took several shots of this photos (with 50 mm) — because of hand shake, ha. And I saw ISO 1270 for a couple of photos. Why? I set ISO to 1250 and auto-ISO is off. Where did 1270 come from?

Next, a small tree in my front yard…


(F/9, 1/250 Sec., ISO-400, 50 mm)

From now on, this one-lens person only had 50 mm lens in hand 😉

How about landscape?


(F/14, 1/25 Sec., ISO-800, 50 mm)

It was on my way back from the trail, I suddenly remembered that this lens is capable of shooting at F1.4.


(F/1.8, 1/4000 sec., ISO-400, 50 mm)

To be honest, I had tried 50 mm once before (for about 2 minutes) and I hated it. Strange it may sound, I think I like it now. The only time that I was a little unhappy was when I saw many ducks in the pond. Without thinking, I started zooming in, and of course I couldn’t with this lens.

Thanks Raj for a wonderful lesson. If it’s not for this lesson, I probably wouldn’t touch 50 mm forever. I can’t wait to try 16-24 mm…

Thanks for visiting my blog.

Posted in photo, photo and thoughts | Tagged | 31 Comments

XDrive Photo Lesson 10 – Black & White

This is my submission for XDrive Photo Lesson 10 – Black & White.

Every week, I look forward to reading Raj’s photography lesson, wondering what his new subject would be. This week is “Black and White”. Immediately, I thought of those portraits I’d taken a couple of weeks ago. Those would be great in black and white, I thought.


(F/5, 1/60, ISO-320, 85mm)

For me, the biggest challenge for converting a color photo to a B/W is balancing the contrast. Everyone has different taste for contrast. For example, comparing to me, my husband prefers lower contrast photos. So contrast is one thing we seldom discuss ;-).

Sometime, I couldn’t even agree with myself. I would set the contrast exactly the way I wanted and only found out, on the next day, that I should tone down (or up) a little. And a day later, I might switch back again. Is this another thing that needs time to get better?

After reading Raj’s lesson, usually, I would find a couple more articles to read, and, maybe, watch a couple of videos on the same subject. This would reinforce what I have learned from the lesson and once in a while, I may even learn something new. Anyway, one photographer said that saturation is our friend when converting a color photo to a B/W. (I wish I could remember who ;-(


(F/13, 1/25 Sec., ISO-200, 105 mm)

On the second B/W photo, I’ve increased the saturation before converting and that was the only difference between this B/W and the above. I don’t know if it’s easy for you to see. I do like B/W #2 better. If you look at the flower bud on the right, you can see that it has more detail on this photo than the one before.

Raj has shown us several examples on when not to convert to B/W. Those examples are very helpful. However, sometimes, you may be surprised.

Fall is finally here. The soy and corn fields look beautiful. I took the following photo with my iPhone for the purpose of studying/remembering the light and the color (in other words, please forget about the composition… ;-).

Since I took the photo because I liked the color, there seemed no reason to convert it to B/W, except that Raj’s lesson this week is about B/W. So I converted it anyway… just to see.

To my surprise, this B/W photo reminds me of an abstract painting I had seen at the modern art museum. I quickly took another look at the original colored photo; I don’t get that abstract feeling at all. Maybe it’s just me… I often like both color and B/W version of the same photo. I like each for a different reason. (By the way, do you see lots of birds… 😉

Can you stand for one more?


(F/18, 1/30 Sec., ISO-1000, 300 mm)

Thanks for visiting my blog.

Posted in photo, photo and thoughts | Tagged | 24 Comments

XDrive Photo Lesson 9 – Focus

This is my submission for XDrive Photo Lesson 9 – Focus. All photos were taken with Nikon D750.

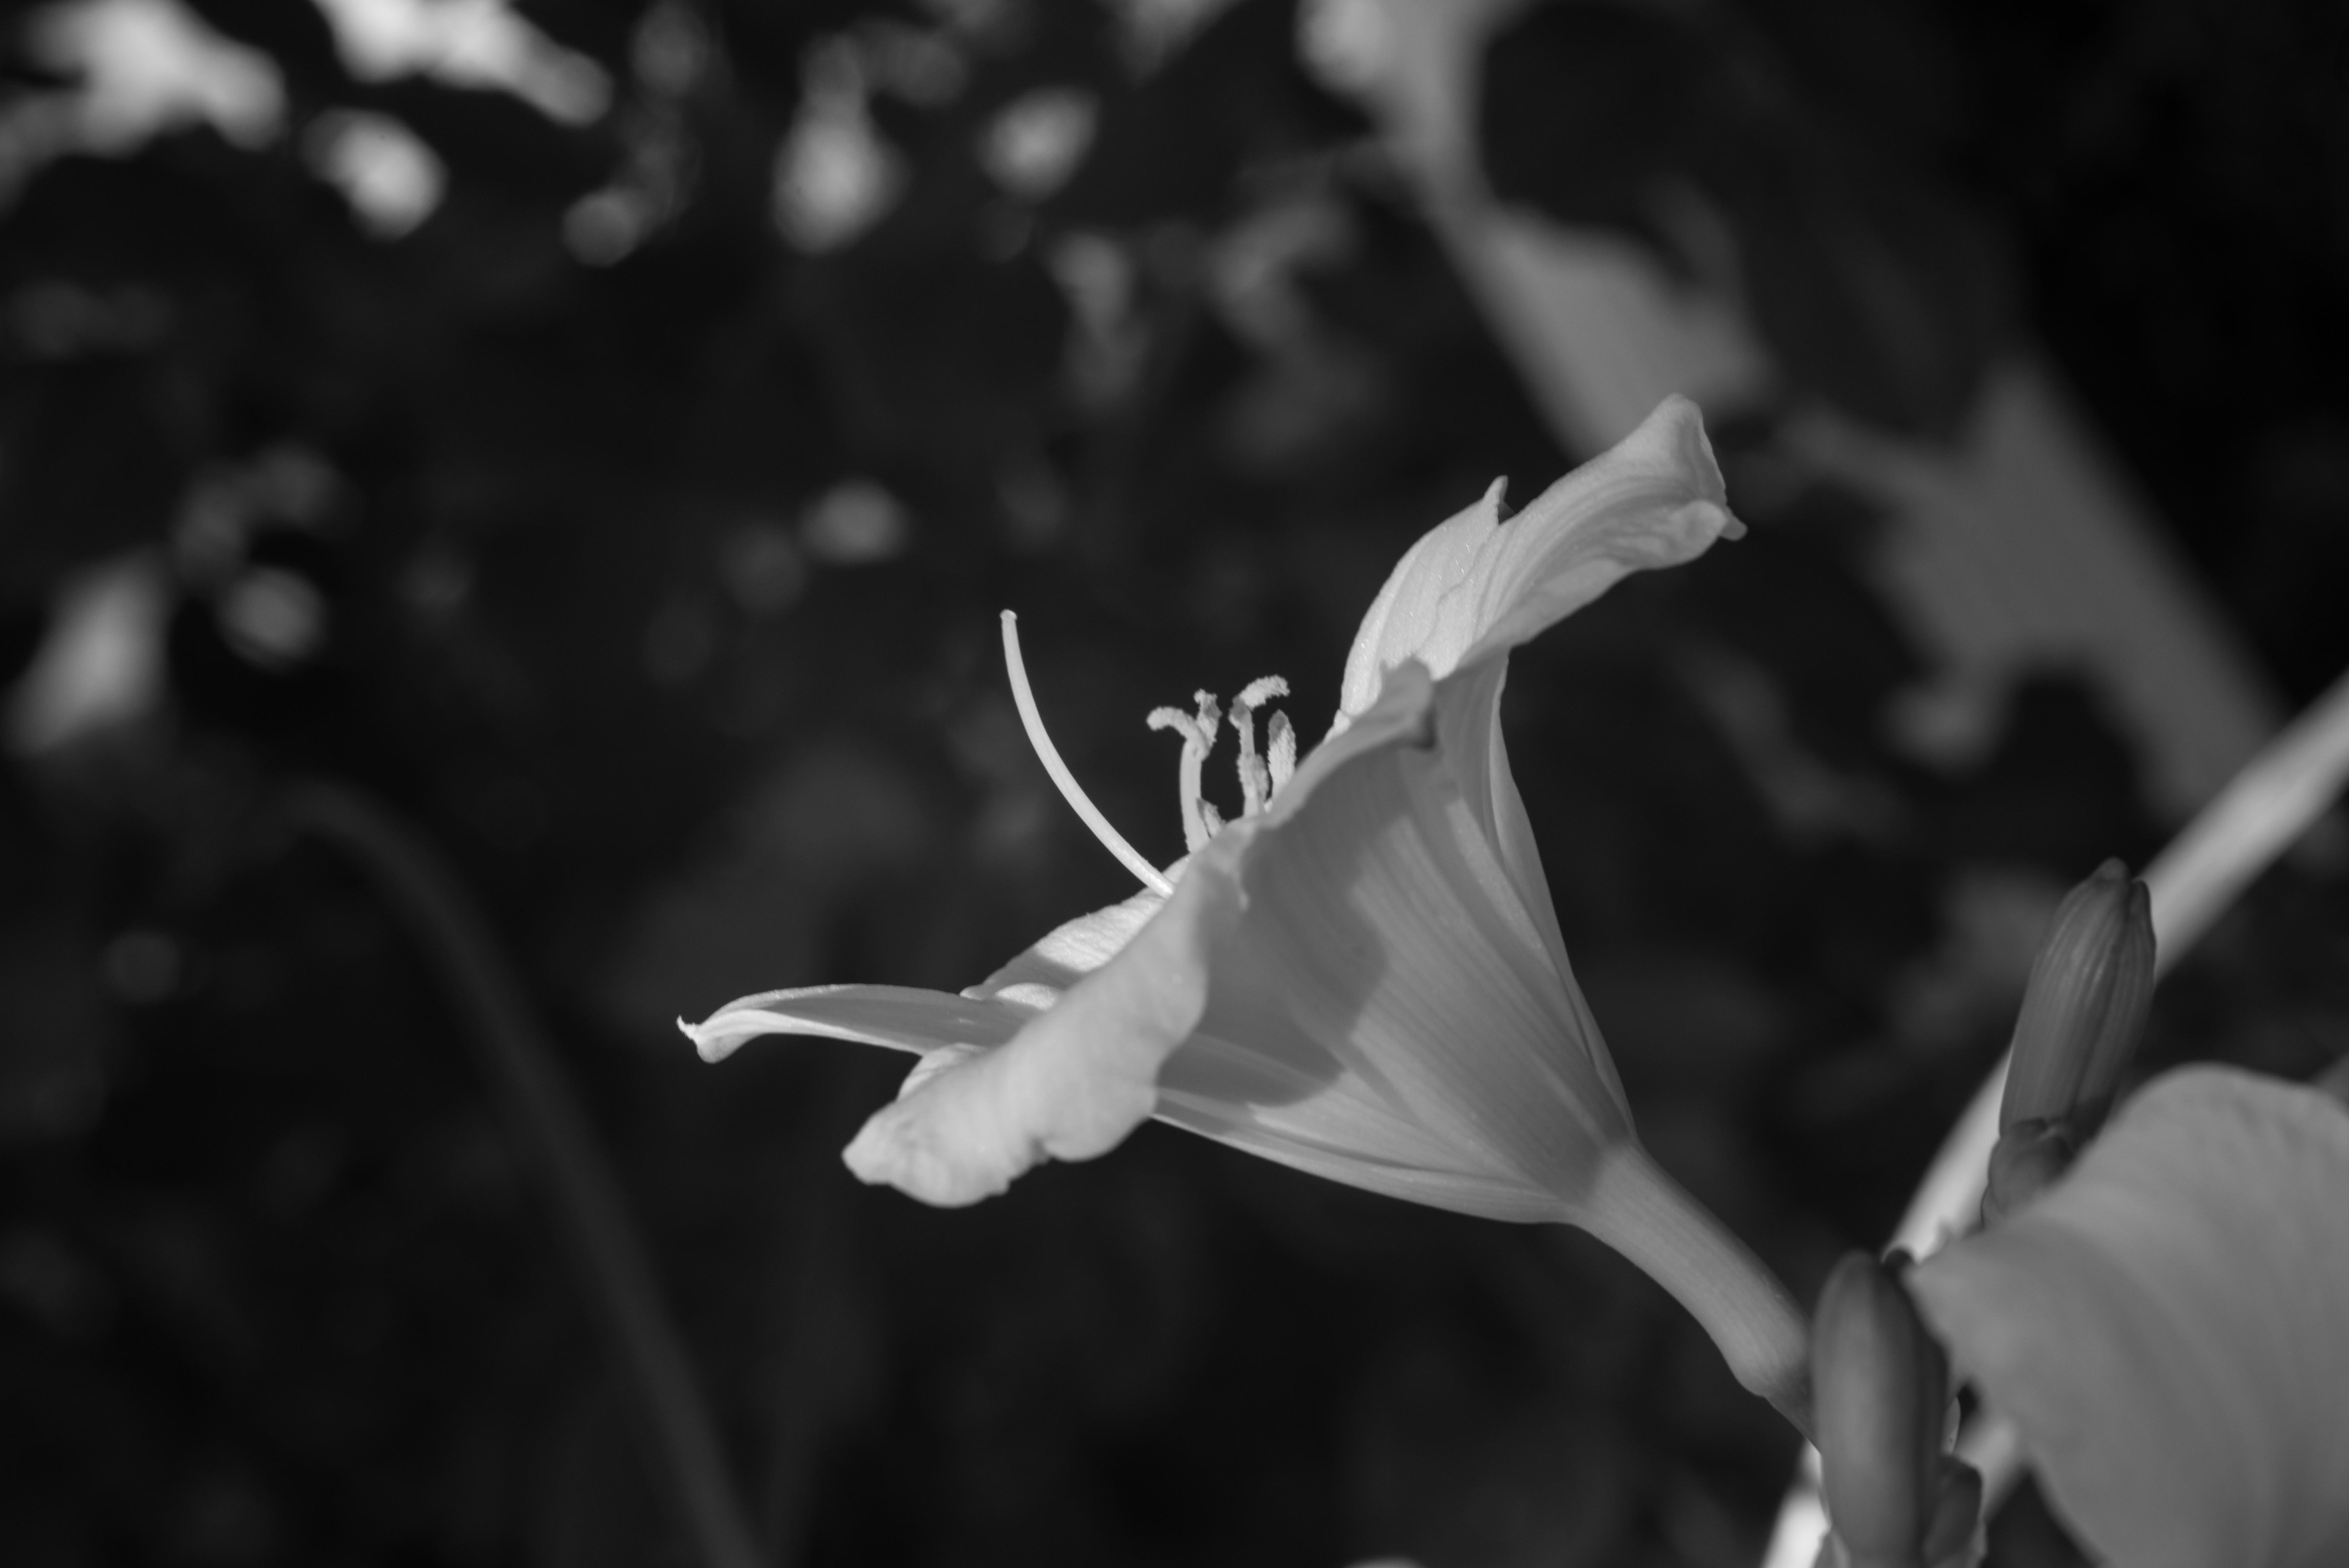
First, here is the daylily photo I posted for XDRive Photo Lesson 8.


(F/13 1/80 Sec. ISO-200 105mm)

In Raj’s comment, he said, “You have an aperture of f13 that should have sharpened the whole flower. The reason is your shutter speed. At a focal point of 105mm, you should be around 1/160 sec minimum. So there is a micro camera shake in the picture.”

Well, it was more than a “micro” camera shake. This photo was taken in my front yard and it was quite windy that day. Anyway, after reading Raj’s comment, I decided to bring the flower inside of the house and give it another try.

(By the way, the black background was interesting for me too. It was during the day; I think it was because the sunlight shinning on the flower, and how far the background was from the subject.)


(F/8 1/250 Sec. ISO-2000 105 mm)

Even with F/8 instead of F/13 (no wind) I can see a lot more details of the flower in this photo! (I mean… Raj was right 😉

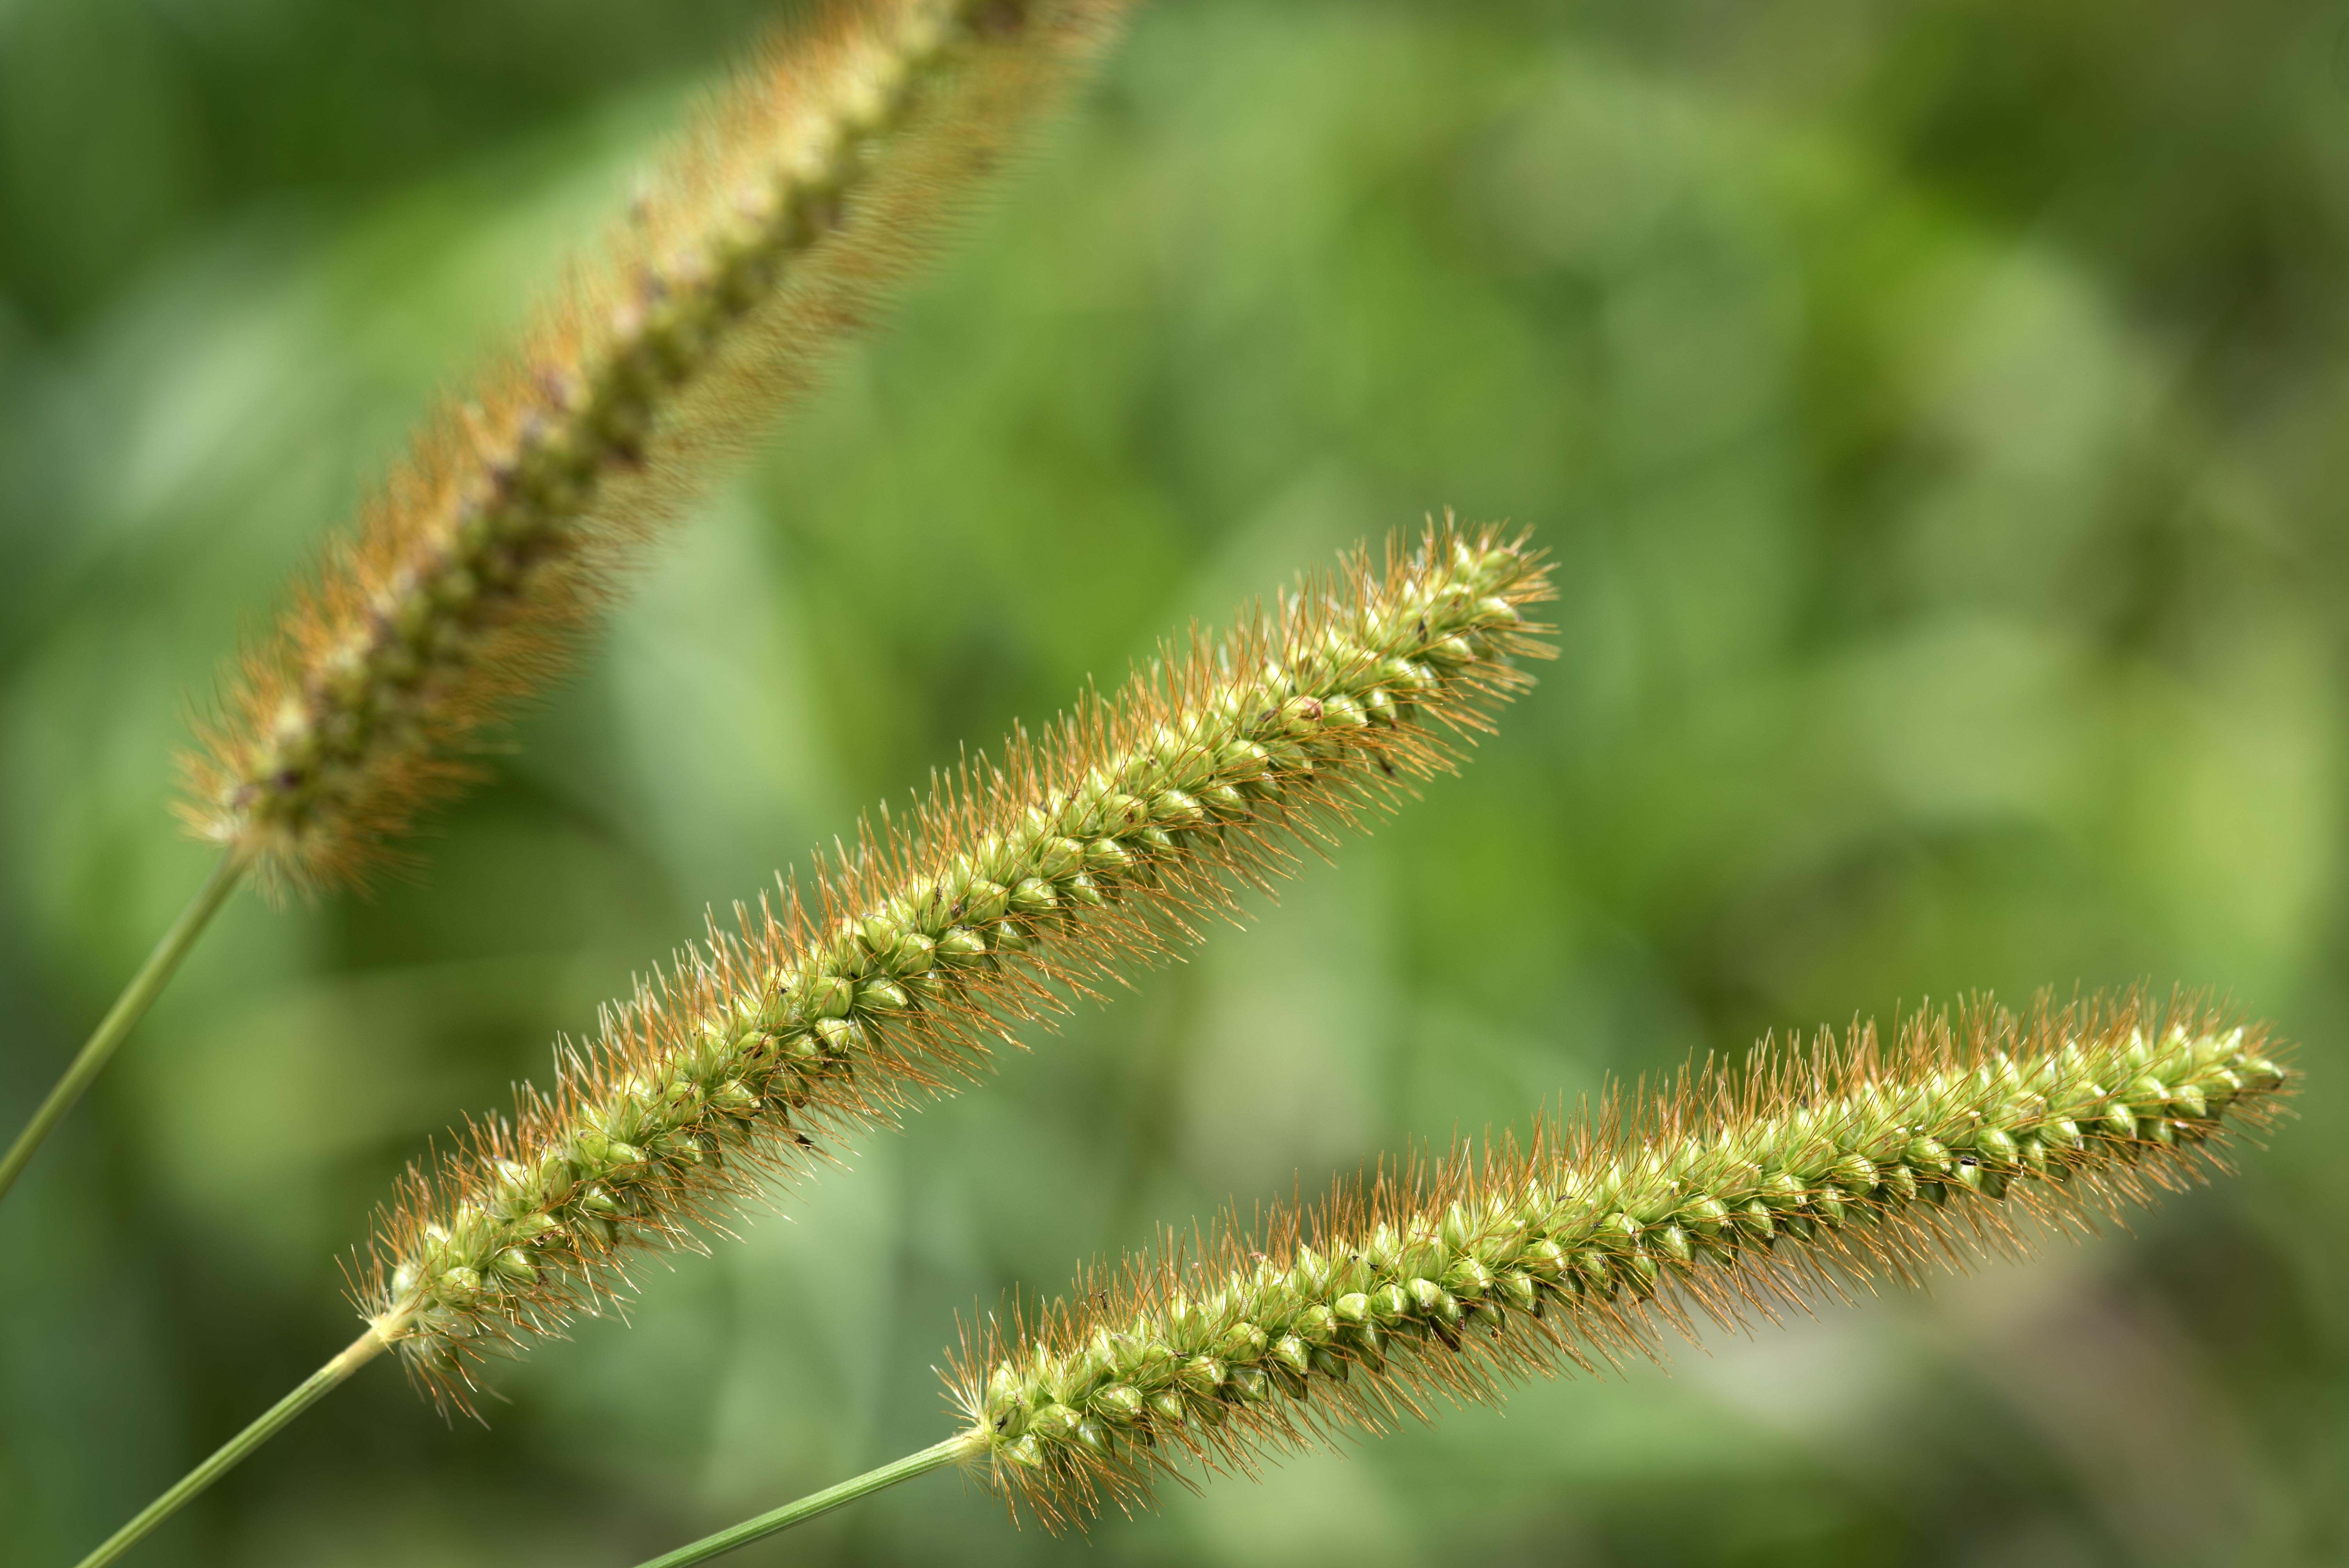
What’s next? Raj had mentioned a couple of things about DOF. I decided to take some photos to help me remember what I had learned.

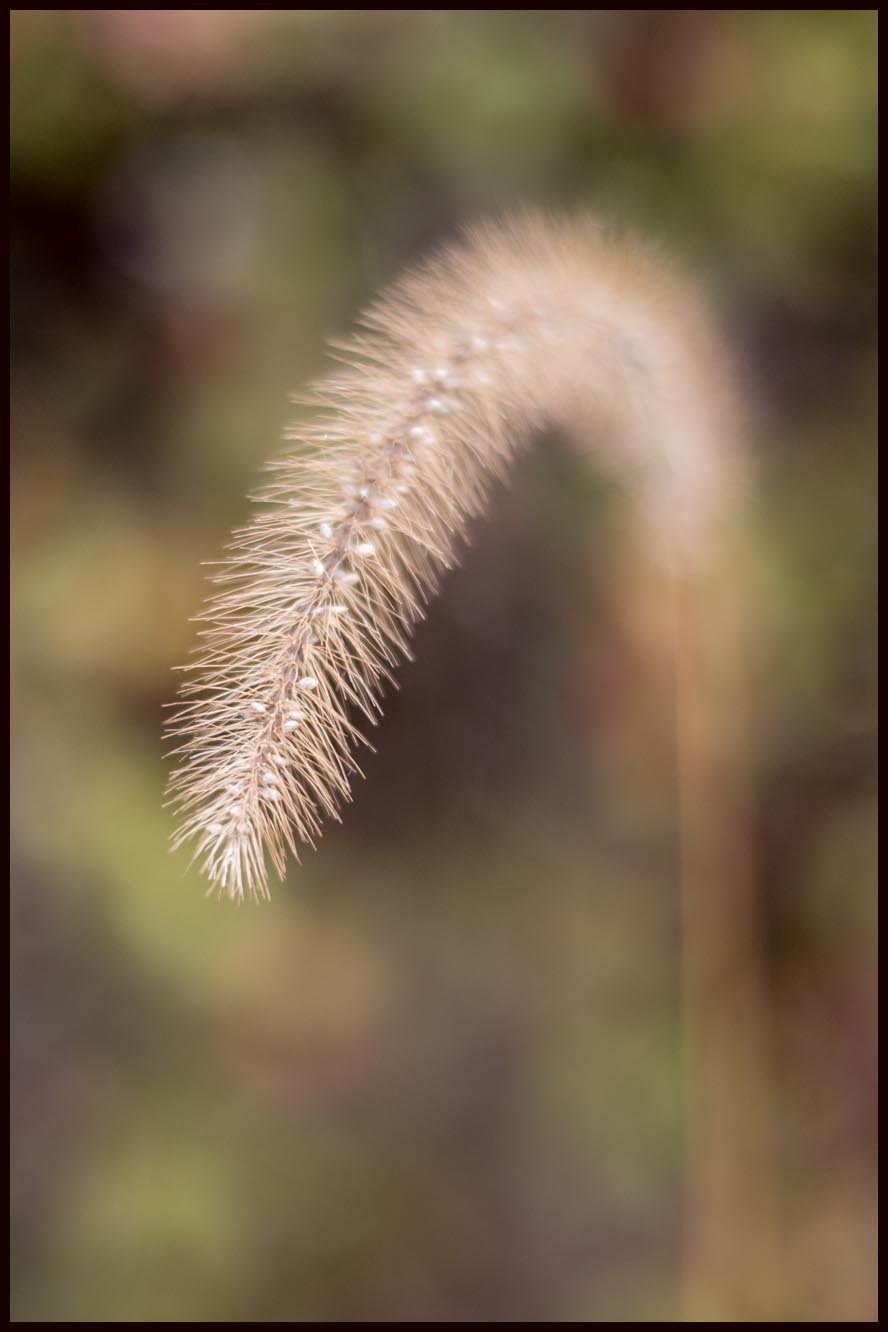
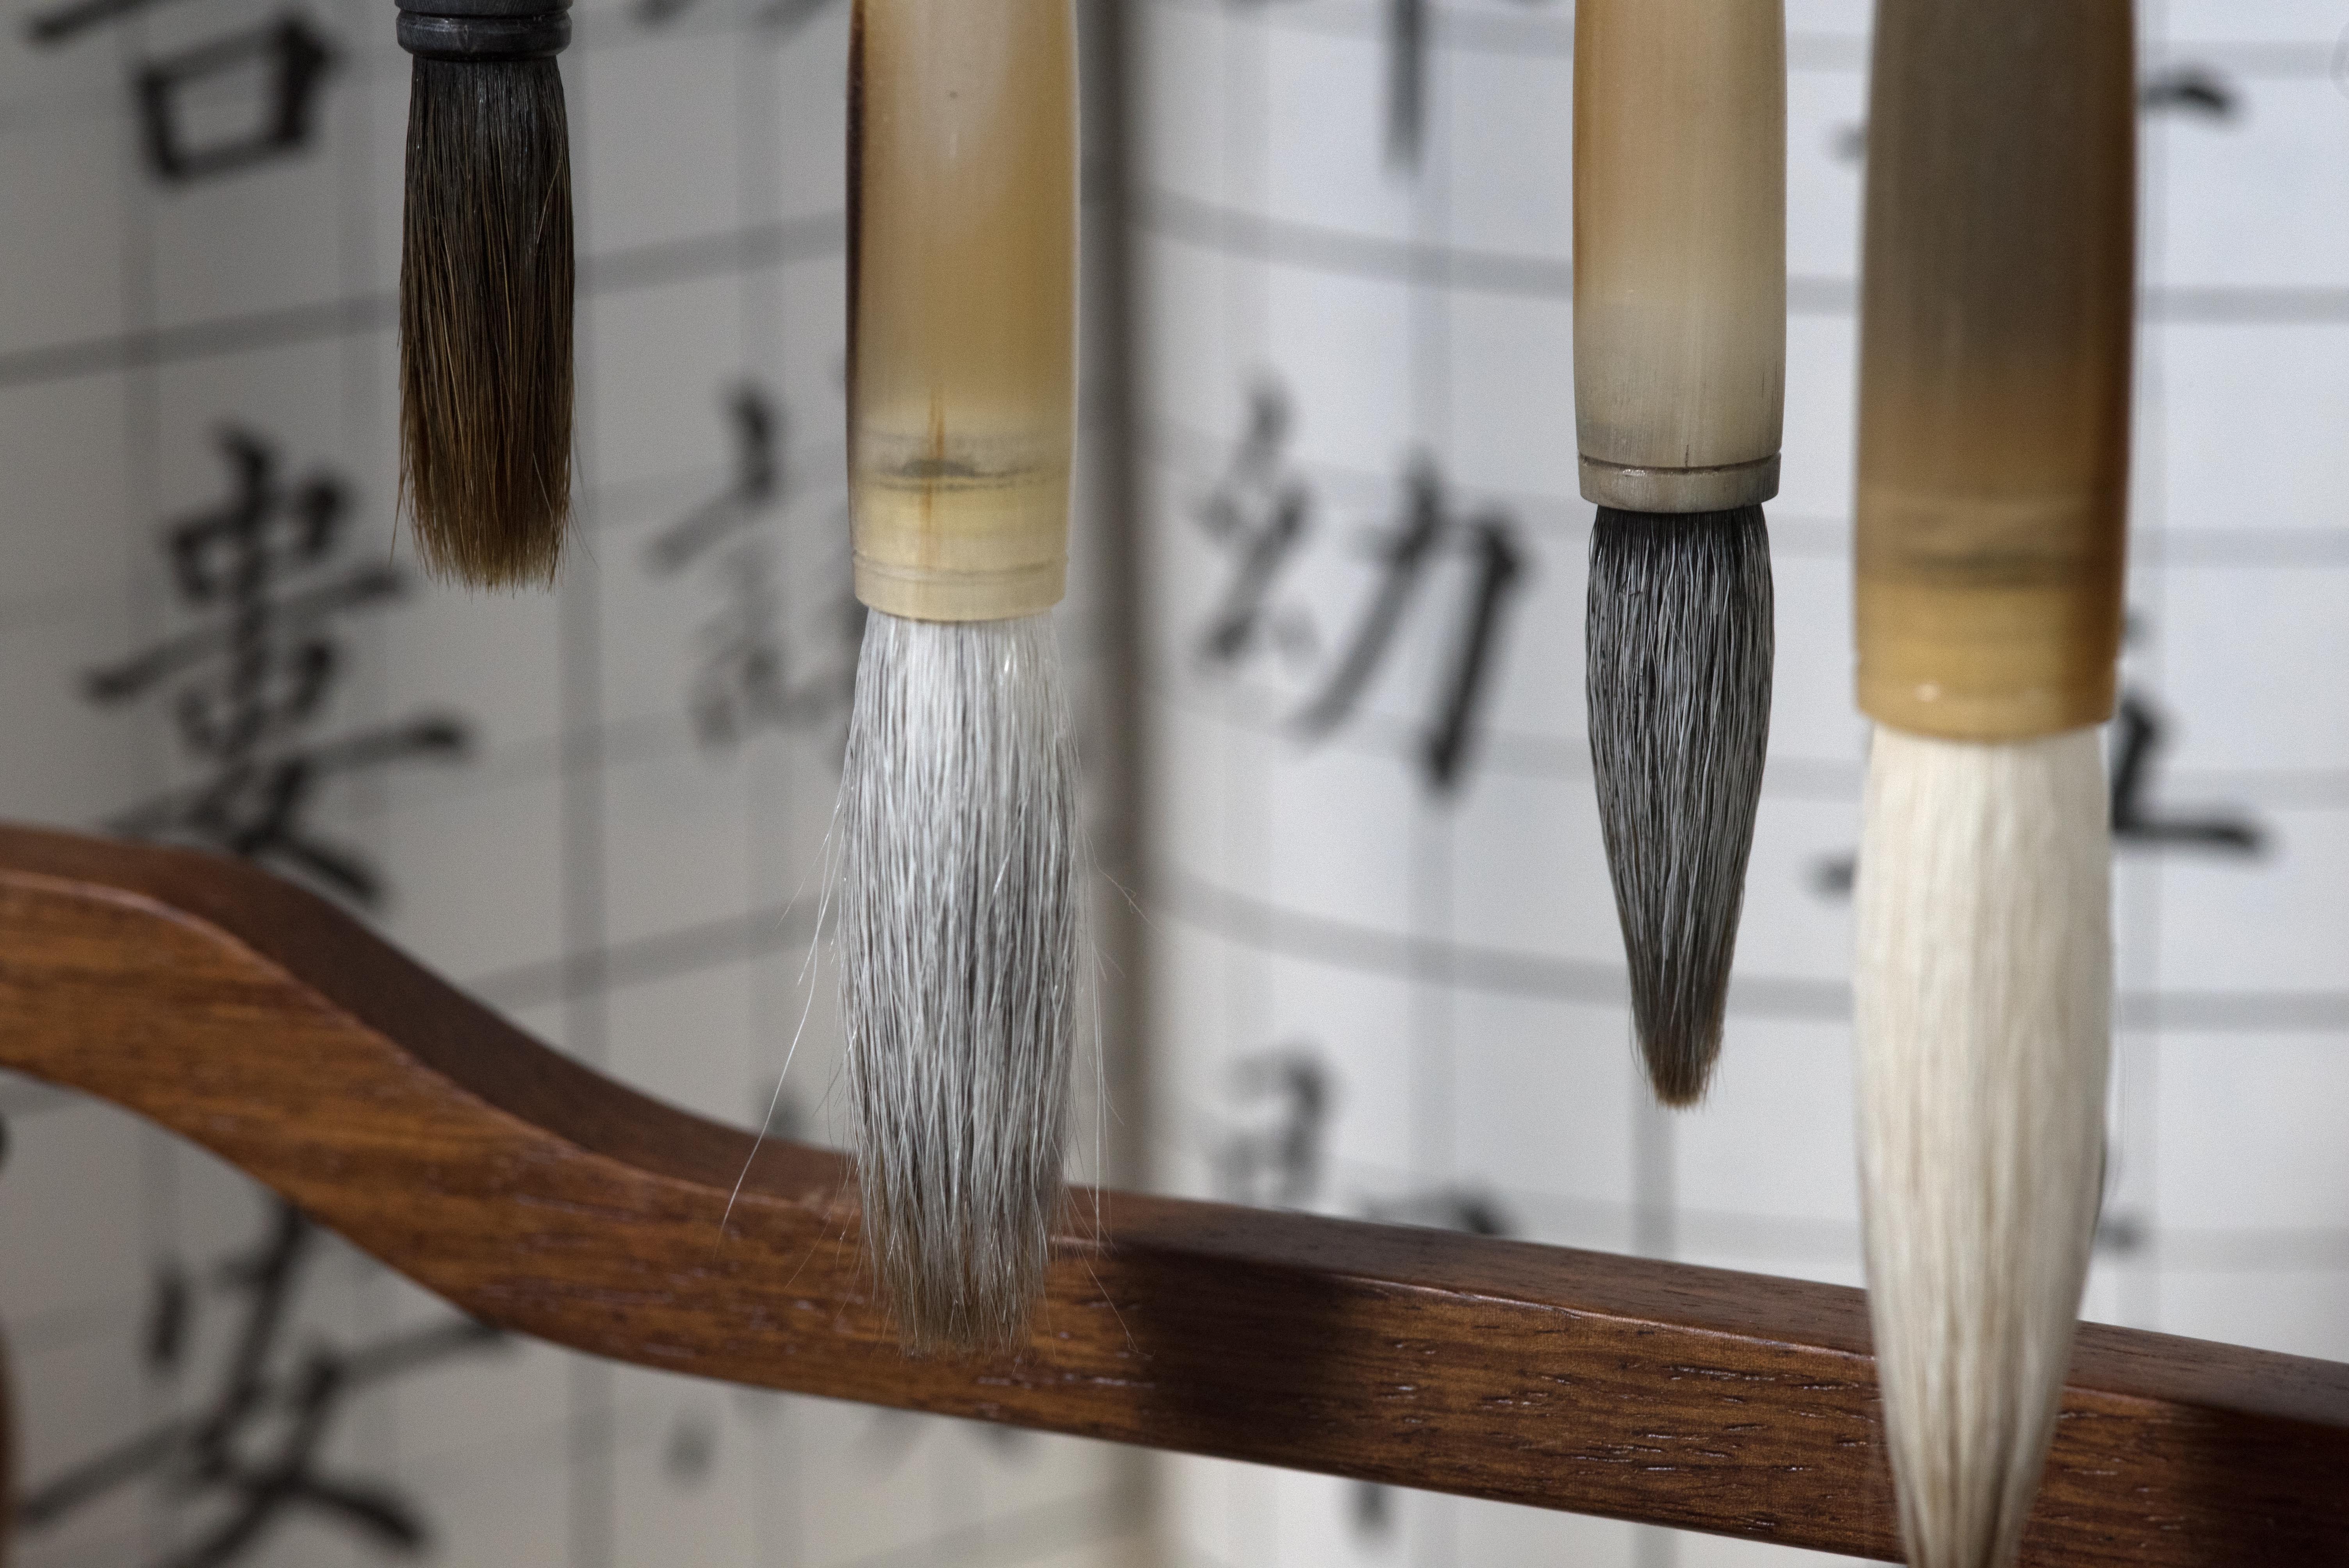
Photo 1 – f/9 1/15 Sec. ISO-1250 105 mm
Photo 2 – f/9 1/10 Sec. ISO-1250 300 mm
Photo 3 – f/5.6 1/80 Sec. ISO-1270 300 mm

The longer the focal length of the lens, the shallower the DOF.

Comparing photo 1 and 2: they both have same F-Stop, but Photo 2’s focal length (300 mm) is longer than photo 1 (105 mm). Sure enough, Photo 2 has shallower DOF (The Chinese character in the background is more blurry.)

The closer you are to your subject, the shallower the DOF.

Comparing photo 2 with photo 3: Based on F-Stop, photo 3 should have shallower DOF (F/5.6 vs. F/9). But because of photo 2 was taken closer to the subject, photo 2 turned out having a shallower DOF.

It’s fun to take photos to “verify” what I have learned. 😉 Not because I don’t believe my instructor, but because I often suspect my camera has its own soul, since it often produces unexpected results ;-).

One thing I want to say about taking sharp photos (focusing) is probably not agreed by many — gear does matter! I am not saying that one can take better (sharp) photo with a more expensive camera; I am saying that the weight of a camera (certain weight is more stable for certain person) and how hard you have to press the shutter release button to take a photo does affect the quality of your photos. In other words, I believe certain camera suits me better than the other. (There, I said it.) I mean… based on my experience, I get along better with certain cameras. 😉

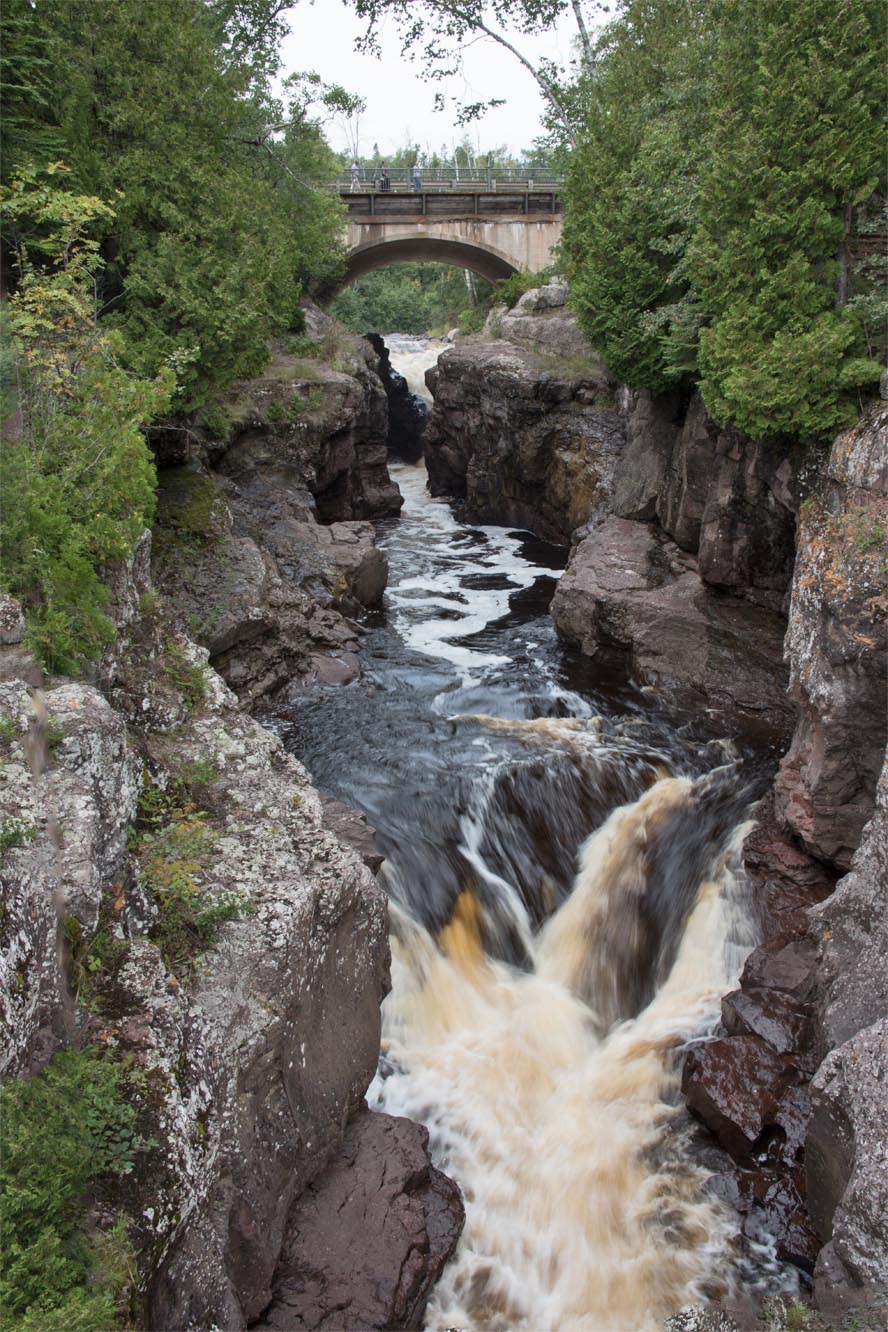
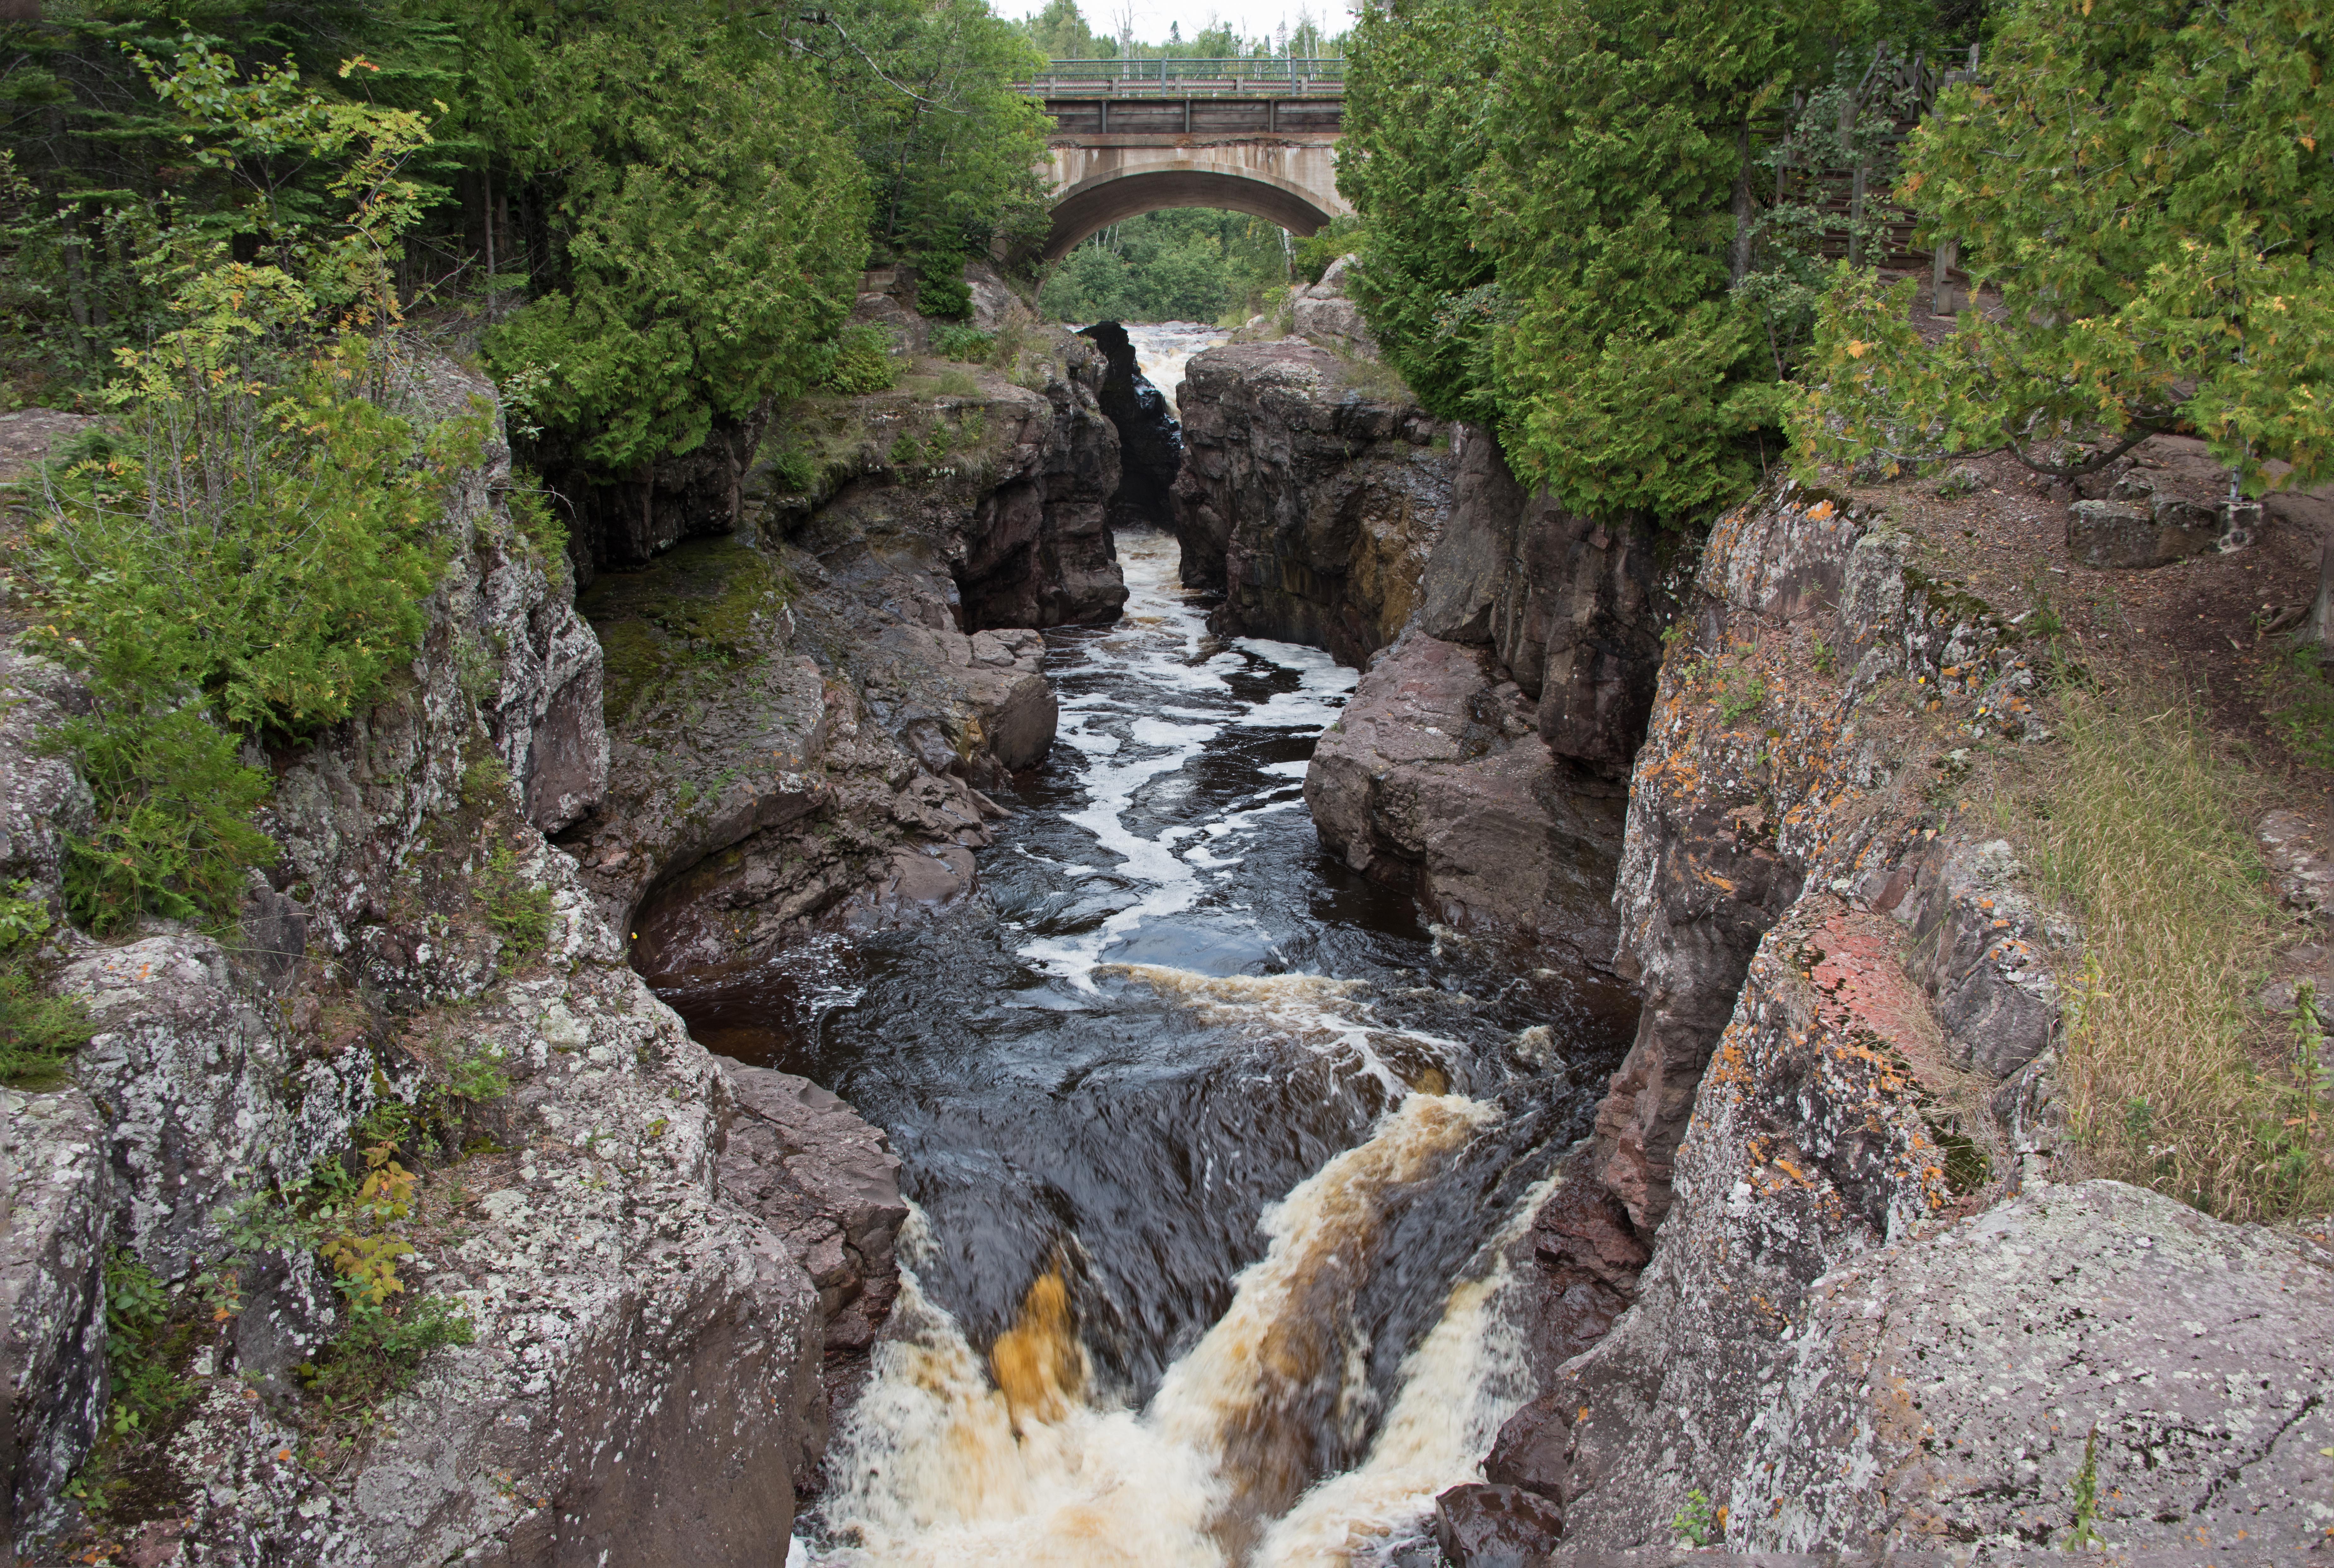
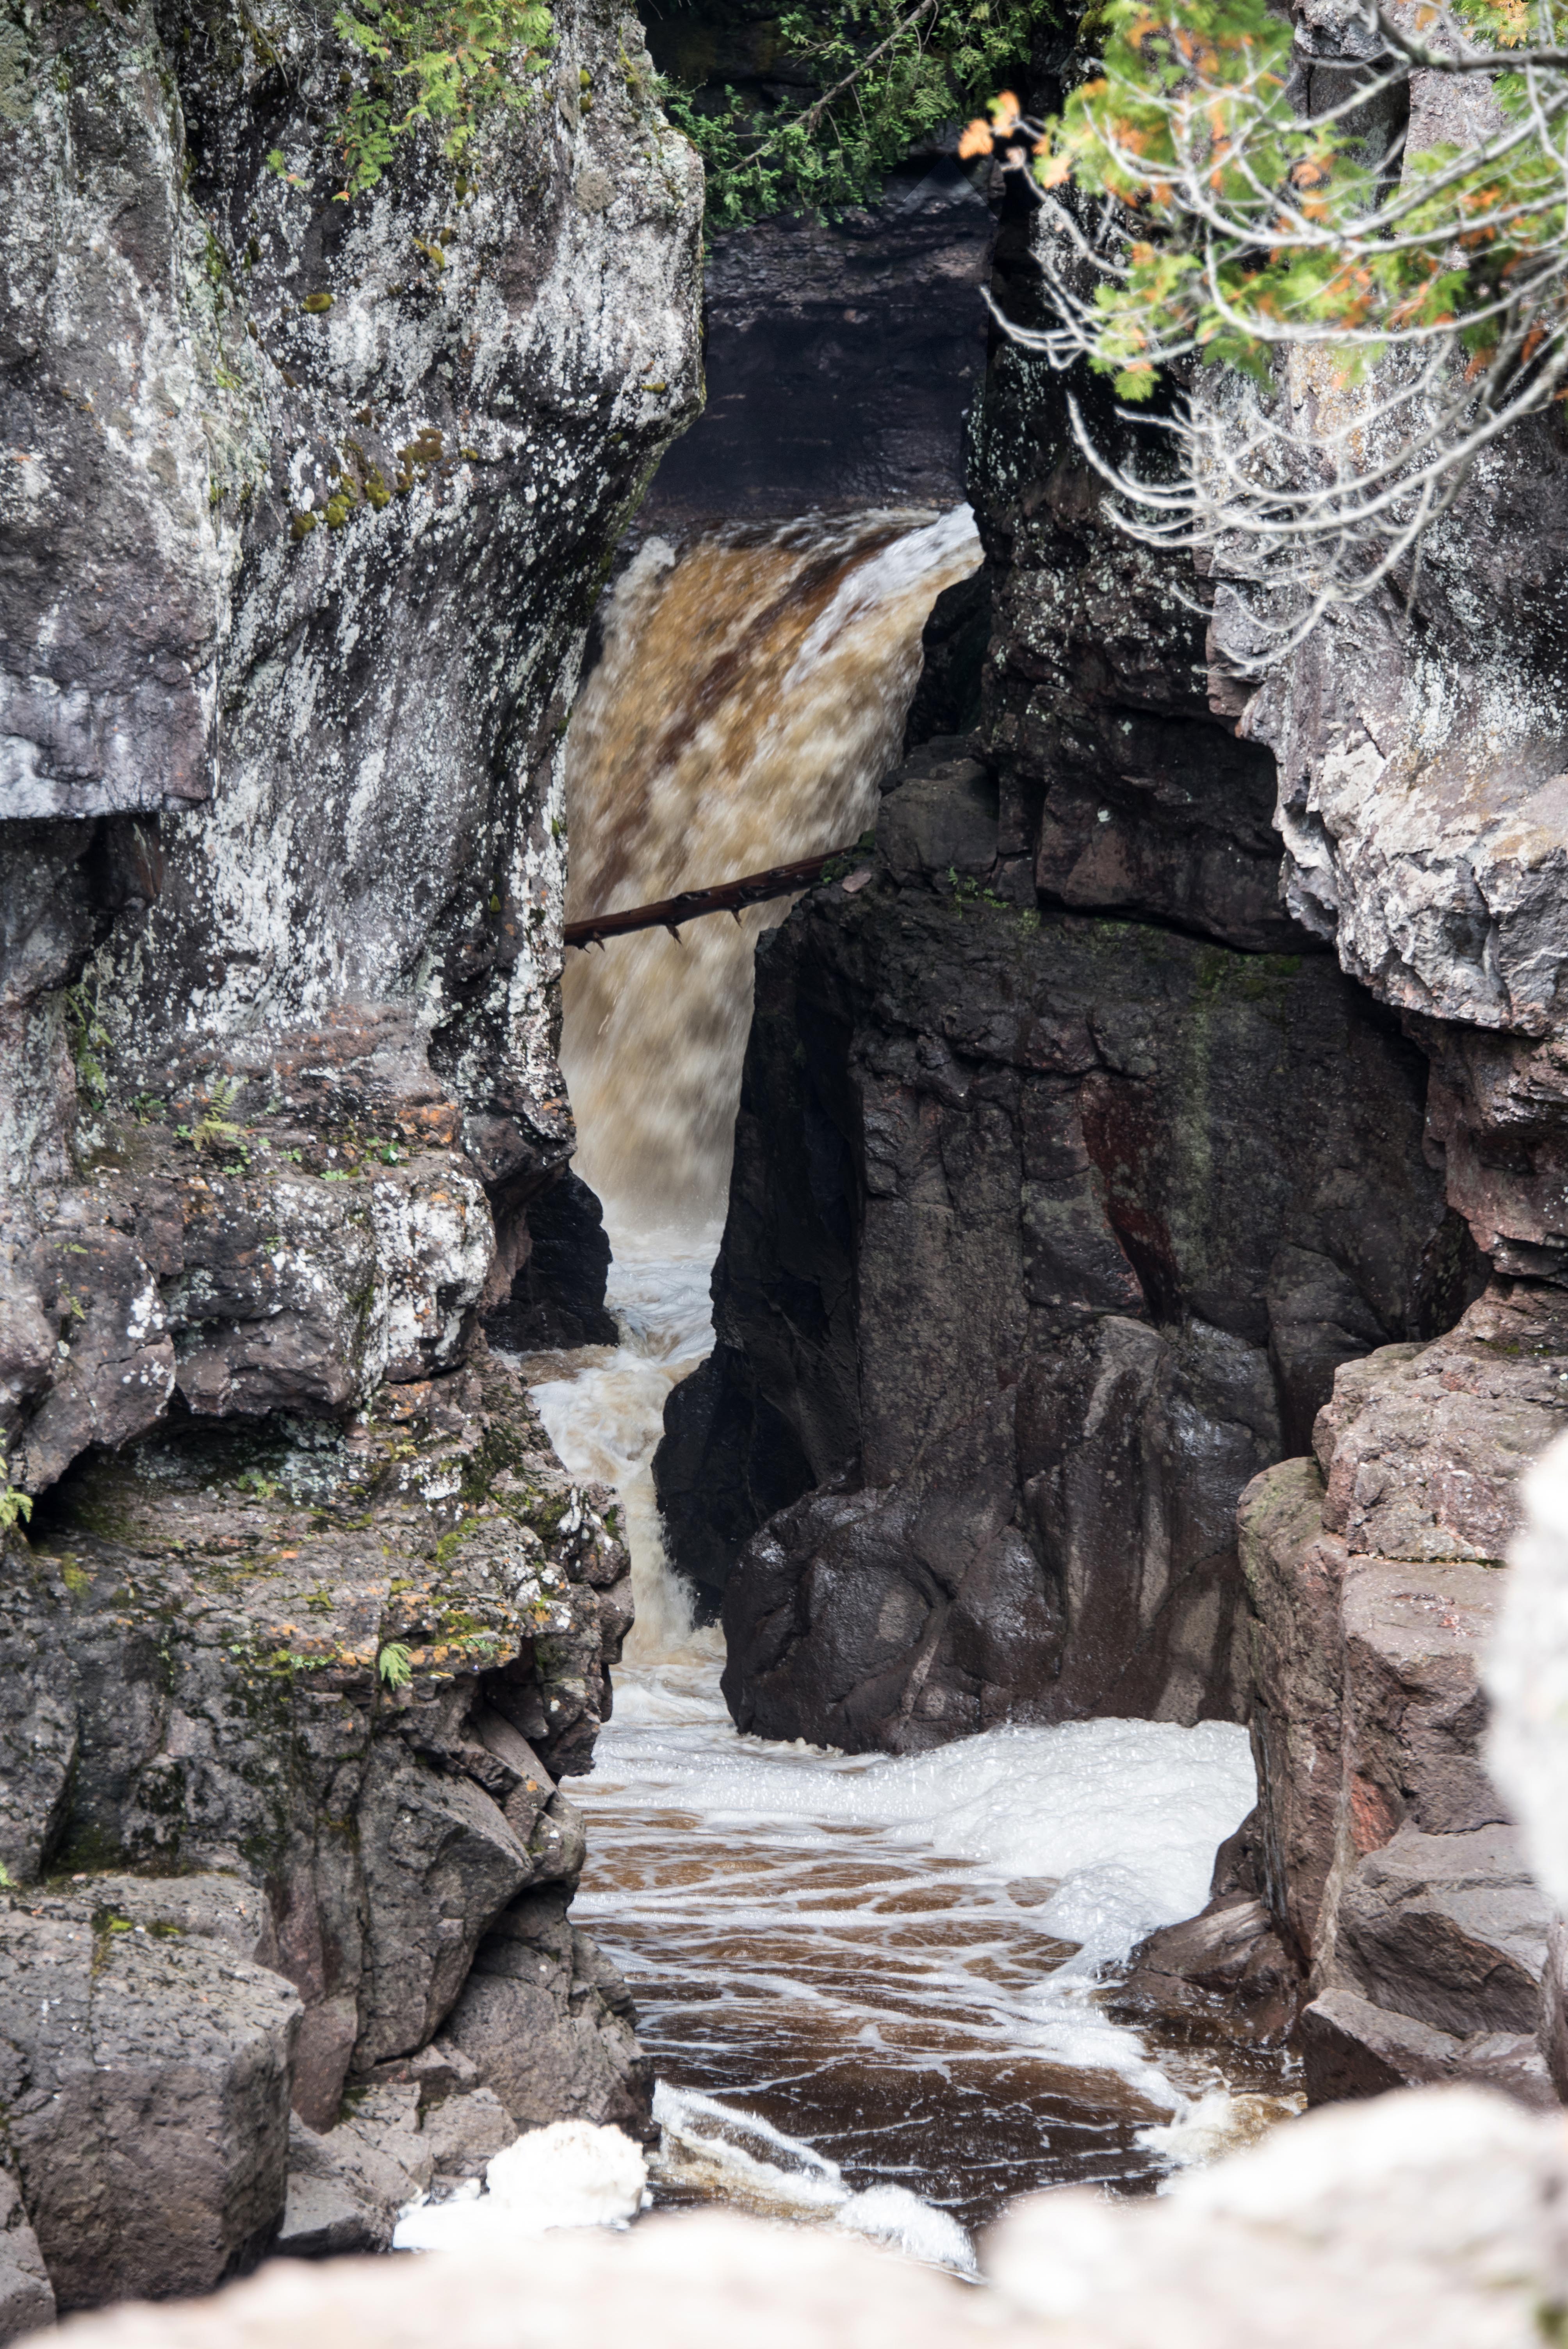
Finally, here are photos I took at the Temperance River State Park. (By the way, I did go back to ask the boy’s email address and emailed his photos to him.)

Both photos: F/5.6 1/640 Sec. ISO-200 300 mm

I was surprised at how these photos had turned out. To be honest, I didn’t have many successful shots with 300 mm focal length (a lot of blurry ones.) This time, I did use the information board to support the camera though.

Even though I am happy with the result, I am quite aware that they can be further improved. For example, it would be much better if I had included the water below in the composition (but in that case, would I be able to see his face expression?). Oh well, all of these will get better with practices, I am sure 😉

Thanks for visiting my blog.

Posted in photo, photo and thoughts | Tagged | 28 Comments

Temperance River State Park

Temperance River State Park is located at one mile north of the town Schroeder on State Highway 61.

It is said the park got its name because, unlike other North Shore streams, the river had no bar at its mouth. At one time, the waters of this particular river flowed so deep and so strong into Lake Superior that there was no build-up of debris. This meant that there was no “bar.” What could you call a river without a bar? For an appropriate, if slightly tongue-in-cheek selection, “temperance” fits perfectly.
— MN Department of Natural Resources

Last weekend, we attended a wedding up north; after the wedding, we visited a couple of state parks and Temperance River State Park was one of them.

Which bridge photo do you like better? I like them both; I like them equally, I am afraid.

Hidden fall is one other attraction in the park.

When we approach the hidden falls, a group of young kids came to greet us. “We are going to jump down the cliff!” one kid said excitedly.

“Is it safe?” I asked.

“Yes. We have two guys down there checking it out and they said okay.”

A moment later, the kid who went down checking came back. “Is it deep enough?” I asked.

“I think so,” He said.

“You have to be 100% sure, okay? Don’t risk,” I said.

Wei positioned himself preparing to take a good photo when the boy jumped. I told him we had to leave. “I don’t want them to jump because of us. If we stay, I am afraid they jump only because they had told us they would.”

After telling them to be careful, we walked away. Right before we were out of their sight, I turned around and saw them waving at us. “OMG, they are going to jump,” I said to Wei.

The kid did, and we did take a couple of photos.

Temperance River State Park is beautiful, but it was the smile on those young boys’ faces that made the trip unforgettable.

Thank you for visiting my blog.

Posted in photo | Tagged | 30 Comments

XDrive Photo Lesson 8 – Closeup/Macro

This is my submission for XDrive Photo Lesson 8 – Closeup/Macro. All photos were taken with Nikon D750 and Sigma 105 mm Macro lens (I didn’t know we have a macro lens! 😉

Raj said, “In this micro world, the colors are so vivid; shapes are intricate, life is very different, nothing is trivial.”

Vivid color was probably the first thing I have noticed.


(F/13 1/80 Sec. ISO-200 105mm)


(F/4.5 1/320 Sec. ISO-125 105mm)

Raj said, “Also, remember by shooting from the nearest distance, you are also separating the background from the subject better.” (Is it because of shallow DOF?)


(F/2.8 1/250 SEc. ISO-3200 105mm)

By the way, this photo was the result after many shots. During the whole process, I gave up 4 times. It still can be better, I am sure.

Just for fun, I lighted up the candle and held the leaf in front of it.


(F/3.5 1/200 Sec. ISO-200 105 mm)

Raj said, “I strongly recommend you do manual focus and not to rely on auto-focus whenever possible.”

I tried using manual focus like Raj suggested, but… every tiny (I mean very tiny) move (shake) would end with a blurring photo. Using a tripod is near impossible. Monopod didn’t help me either. Maybe it’s not for senior citizens? 😉

(Bee: F/3.5 1/200 Sec. ISO-125 105 mm Cricket: F/2.8 1/200 Sec. ISO-1600 105 mm) )

The bee — the difficulty of using manual focus is particularly true when shooting bees. Bees don’t stay at one spot long. They move constantly and they move fast. I finally switched back to auto-focus, and even with auto-focusing, it took many tries to get one that looked “okay”.

The cricket – it’s probably better if the whole cricket is in focus. I am not sure using F9 would help in this case, since its head was closer to the camera than its body. After giving some thought, I came to a conclusion that if I lowered my body, I might get the shot I wanted. I tried to re-take with F13 in manual mode, but I didn’t get any good one (got two mosquitoes bites instead.)

(By the way, people said we should focus on the eye. Do you see how small those eyes are?)

Raj said, “Close up shots are the most time-consuming photography activity in my opinion.”

I agree. I shot 300+ photos for this lesson and most of them (95%?) went straight to the trashcan. ;-( I didn’t realize how much I LOVED my zoom lens; I can’t wait to switch back! But I definitely will miss those vivid colors. 😉

Now, a confession… after reading Raj’s comment for Amy, I realized that what I-thought-macro-photographing-was is not what it is. I use to think the challenge of taking a macro photo is to be able to focus on a small spot; the smaller that spot is the better. Now I know that, not every in-focused tiny spot has an impact to viewers. The real challenge for me is to know what should be in focus and how to achieve that. (Thanks, Amy and Raj.)

Final question… Reversing the lens — isn’t that hard? I mean… one hand has to hold the lens, and the other have to focus and shoot. Also, dust may get onto the sensor, right?

Thanks for visiting my blog.

Posted in photo, photo and thoughts, Photo Question | Tagged | 35 Comments