
This is my submission for XDrive Photography Learning – 20 – Bokeh.
Bokeh means blur. It was the first thing I learned when I became serious in photographing several years ago. I learned that to blur the background, I should shoot in aperture mode with F4.5 (I believe, F4.5 was the maximum aperture I could get with my equipment back then.) I didn’t know ISO, shutter speed… Using aperture mode and F4.5 , whenever I needed to, made me happy enough. A blurring background makes my subject stand out, and I like that a lot.

I haven’t given bokeh a lot of thoughts until I read Raj’s lesson. While working on the assignment, I found out it could be used to create surprises. For example, in the following photo, my instant reaction was to blur the candle. After taking several blurring-candle photos, I wondered what if I focused on the candle instead, and I was surprised how much I like that little twist.

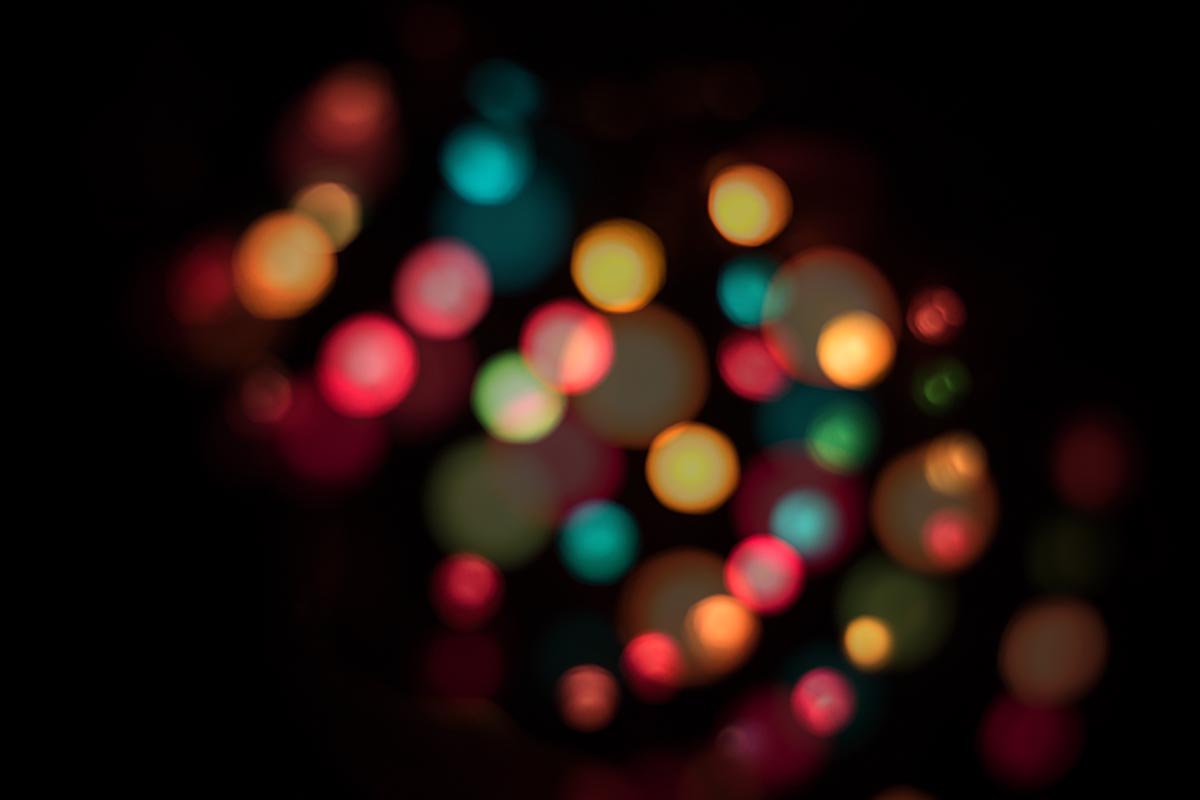
Once in a while I caught some bokeh highlights in my photo, but I’ve never figured out how to recreate them. After carefully reading Raj’s lesson for a couple of times, I realized that as long as I didn’t focus on the lights, I would get the effect I wanted. 😉
Then I remembered one blogger had posted an article on creating a custom bokeh (I believe it was Kelly, but if I am wrong… 😉 I was anxious to try, but later totally forgot about it.
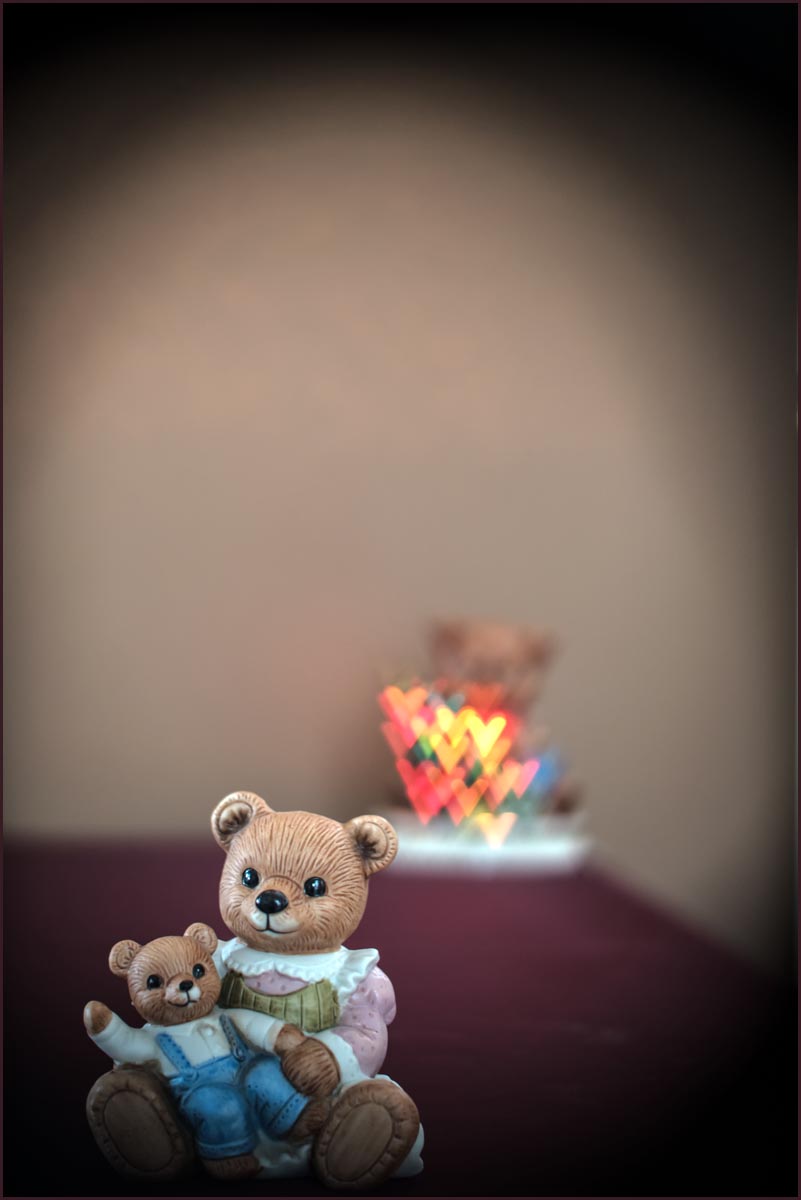
I made a small heart-shape hole on a piece of black paper and held the paper right in front of the lens to create the following photo.
I had so much fun. Thank you, Raj, for another great lesson.
Thanks for visiting my blog.

The small heart-shape hole… is really cool, Helen.
The Buddha statue and the candle light is very special. Well done!
LikeLiked by 1 person
Thanks, Amy. The heart shape bokeh is fun and easy to take. Worth to give it a try 😉
I find myself keep going back to shoot the same subject like the Buddha statue. I like to redo the old photo after I learned some new things 😉
Have a great day.
LikeLiked by 1 person
I think I saw the demo of the idea (the heart shape) on Youtube sometime ago. It does take some patience and skills.
LikeLiked by 1 person
Not at all, Amy. Here is a link… scroll down to the custom bokeh section, there is a photo showing how he does it. I didn’t even secure the paper on the lens, simply holding the paper right in front of the lens.
https://photographypro.com/bokeh-background/
Have a great evening.
LikeLiked by 1 person
Thank you for the link, Helen! Really cool 🙂
LikeLiked by 1 person
Beautiful photos, Helen! The last one is my favorite. Perfect for a greeting card or even a simple postcard. 🙂
LikeLiked by 2 people
Thank you for your comment.
Not sure if I have commented on your photos. I like them a lot! Most of your photos are minimalist, yes? I think those are harder…
Have a great day.
LikeLiked by 1 person
Thanks for the kind words, Helen. And please don’t worry about commenting on my photos. I am more than happy if someone at least sees them. 🙂
LikeLiked by 1 person
I wouldn’t miss it (seeing your photos). I like your style.
Is Dilip your name? I tried to figure out from your blog, but I didn’t find any info ;-( I just wonder how to address you.
Have a great day.
LikeLiked by 1 person
Thank you so much Helen. 🙂 Yes, Dilip is my first name. It’s time I did an “about” page I guess. Never really thought my blog will take off and people would be interested in my photos. That’s why I started without any info about me.
LikeLiked by 1 person
I like the idea, because I have been wondering for a while… what kind of person would take these beautiful photos. 😉
LikeLike
Helen–these are great. I love the heart shaped and the photo of bokeh highlights only. I was intrigued by how to achieve that so now I can’t wait to try.
LikeLiked by 1 person
Thanks, Lois. Here is a link that shows exactly how.
https://photographypro.com/bokeh-background/
I didn’t secure the paper onto the lens, simply holding the paper in front of the lens (because I am lazy 😉
Have a wonderful evening. .
LikeLiked by 1 person
Thank you, Helen!
LikeLiked by 1 person
Hey Helen, I was wondering what you come up with, and as always you have always a special way of doing things!
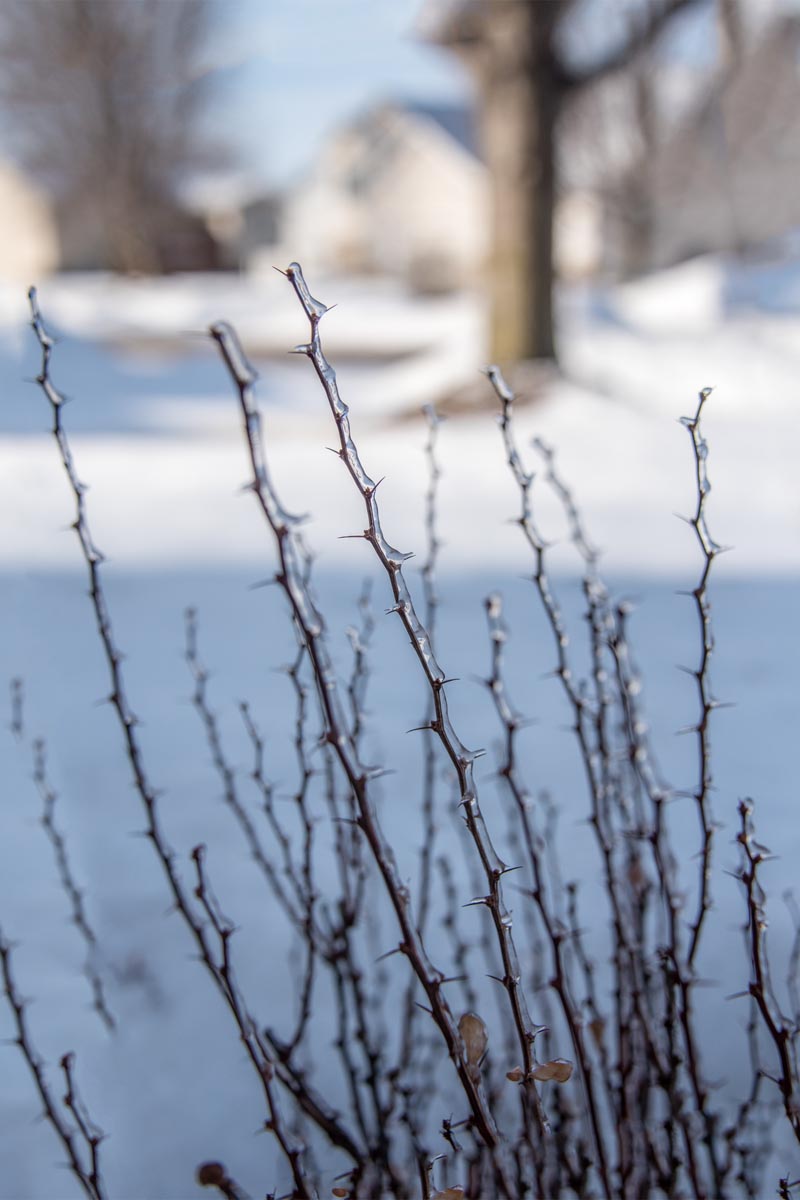
Pic 1: great picture of winter and the lifeform left over. Sunlight in the background tells the story of change is on the way. Composition wise I would have avoided that thick tree in the background. Just imagine this shot without that tree in the background. Also, I noted that there are some editing mistakes (check the top right and the left, probably some cloning happened?)
Pic 2: Nice shot, snow turning into the glass is always a welcome time in winter land. The horizon needs to be corrected. Even if it’s not a horizon still it’s better to level it as immediately it gives the feeling the image is not upright.
Pic 3: This is a great shot, yes putting the candlelight in focus is important here. If the light is in the background then its fine to focus on Buddha. Surprisingly it looks like Buddha is grazing at the light. The label on the candle is not so desirable in this kind of photography. It’s nice that you took advantage of artificial light from the right, but since your candle is in the front, you should add your artificial light also from the front. Hope you get the point. Basically, it should look like your lamp is lighting the Buddha.
Pic 4: Yes that’s the way to get bokeh highlights, That’s why it’s important to have subject very close to your camera. In this case, if you had placed something very close and focused on that subject still your background will show the same bokeh rings.
Pic 5: Yes that’s what Kelly did it sometimes back. You can have your own type of bokeh highlights this way. I think you had limited light source here, this would look great when the whole of your background is filled with such effects. You need multiple light sources in the background(Maybe Christmas tree? yes you have to wait for a year)
This comment is part of XDrivess photography learning sessions. Thank you, Helen, for your excellent work and showcase here.
Raj
LikeLiked by 2 people
Wow, you are good! Thank you, Raj. Now it’s clear how much I’ve missed reading your comments.
We had freezing rains for a couple of days. The first two photos were taken after the freezing rain.
Pic 1 : I read your comment at 3:30 am. Usually, I would just go back to sleep, but your comment for pic-1 confused me, because I didn’t do a lot editing for this photo. It took me a while to figure out what happened to the upper left and right corner — it is from auto-fill when I straightened the horizon 😉 I used to check all corners every time after straightening a photo, but since the software had done such a good job in the past, I have been more relaxing on checking the result ;-( Oh well, lesson learned. (I’ve changed the photo on this post because I can’t stand it 😉
Pic 2: it’s the shadow on the snow. After straightening the horizon, I didn’t like the photo as much (it doesn’t grab me. I think because my eyes spend more time on the foreground and there is too much of foreground for me), but after cropping it to portrait mode, I liked it.
Pic 3: LOL. You are absolutely right! I thought that extra light would create some shadow and make Buddha’s face look better. It’s always like that: you think of of thing and miss the other. I definitely want to retake this one. THANKS!!!
Pic 4: This is just for fun. I saw you have one photo, which has bokeh highlights only and was anxious to give it a try, since I have never done that. I am still not sure how you took yours. Panning? Or post process? I am talking about the photo that has circle highlights.
Pic 5: It took me a while to figure out what I could use for the light source. Even during Christmas time, we don’t have any extra lights (but I can go to my neighbor’s house 😉 I do have limited light source for this one.
Thanks again. This is fun.
LikeLiked by 1 person
Thanks Helen for the clarification on the pic 1.
Pic 3, its important that you move the light, otherwise there is no visual importance for the candle there. Yes, you could have backlight as additional lighting but front lighting is very important.
Regarding the highlight bokeh in my pictures, they are taken in a flower show. I found a miniature lighting put out. I composed the shot that way whole of the background filled with the lighting. But I had to come very close the flower so that bokeh is at maximum level. No panning or post-process involved here. But I have a lens with f 1.4 so generally, it’s not that difficult to take such shots.
Glad that you had good session and fun… Cheers..
LikeLike
Pingback: XDrive Photography Learning – 20 – Bokeh – XDrive
What a wonderful selection of bokeh shots, Helen. The last one has got to my favourite. So artfully, well presented and thought out. It’s a photo radiating with warmth. When I first got interested in photography, I was also keen on bokeh and learning how to achieve that. It certainly has quite an effect with lights, and also coming in hand when you are shooting people and portraits 🙂
LikeLiked by 1 person
Thank you, Mabel. The last one… the background is a bear holding a Christmas tree. The bears in the front and back are gifts I received many yeas ago from my host family. I had this host family when I came to US to the graduate school 40+ years. Lots of memories 😉
Have a great day.
LikeLike
Wow. You kept those bears after all these years. They look so new and so well kept…and also well behaved 🙂 Looking forward to seeing what else you will do with your photography 🙂
LikeLiked by 1 person
I used Christmas lights to create bokeh photos, I also have several types of patterns to create the bokeh in the shapes of heart, music sign, birds, etc. I will be more than happy to share with you when we meet for photography in spring time.
LikeLiked by 1 person
Cool! We give all of our Christmas lights away several years ago ;-(
Pixelated effect looks very interesting, but it seems complicated. I haven’t had a chance to give it a try yet. You did an excellent job on that!!!
LikeLike
There is something unique about the last image which brings to mind children’s literature. The Little Princess, perhaps.
LikeLiked by 1 person
Thank you, Brenda. A part of me refuses to grow up… 😉
Have a great day.
LikeLiked by 1 person
Pingback: XDrive Photography Learning – 20 – Bokeh | The World Is a Book...
I always enjoy your submissions Helen .. you have such a great eye! Clever you .. Did you change the first pic? I couldn’t see the editing problem that Raj mentioned. Auto fill .. is that Lightroom 😃
LikeLiked by 1 person
Thank you, Julie. Yes, I changed the first photo — it was an embarrassing mistake 😉 I was using Photoshop. When you use the “straighten tool” to correct the horizontal or vertical line, quite often if not always, the 4 corners would be out of your original photo. There is a checkbox called “Autofill edges”. If you check that box, Photoshop will automatically fill the edges (corners) based on what is around the edge. Photoshop does a pretty good job most of the time 😉 In this case, I don’t know why, it seems like it filled the upper two corner with what was on the bottom two corner. I had never seen this before.
Have a great day or evening, Julie.
LikeLiked by 1 person
Wish I could use photoshop .. I find it daunting. A lovely evening to you Helen 🙂
LikeLiked by 1 person
So lovely Helen!!!
LikeLiked by 1 person
Thanks, Paulo.
LikeLiked by 1 person
Helen, it looks like you have mastered bokeh.
LikeLiked by 1 person
Thank you, Hien. I think I got it now 😉
Good night.
LikeLike