
This is my submission for XDrive Photo Lesson 3 – Exposure. (All photos were taken with Nikon D750.)

(Rose – F/5.6; ISO-400; 1/160)
A young and brilliant photographer Spencer Cox, whose photos I like a lot, wrote the following in his article Composition Tip: Give your Subjects Breathing Space : “Composition has no correct answer. The best you can do is to create something that looks good to you, or looks good to your intended audience.”
Got it. But… can we say the same thing about exposure?
About 3 years ago I watched a video of a professional woman photographer speaking about portrait photographing. If I remember it right, she said something like: don’t be afraid of over exposing. She then showed us several of her over-exposed portraits. I frowned… those photos were too bright (white) and they looked two dimensional. But, in a strange way, they attracted me. I guess it is true that one can break the rules if he knows them.
I am not as experienced or as confident as that woman. I don’t intend to try under or over exposing for any of my photos for another 5 or 10 years 😉 However, since I didn’t use manual mode for very long, accident happened. 😉
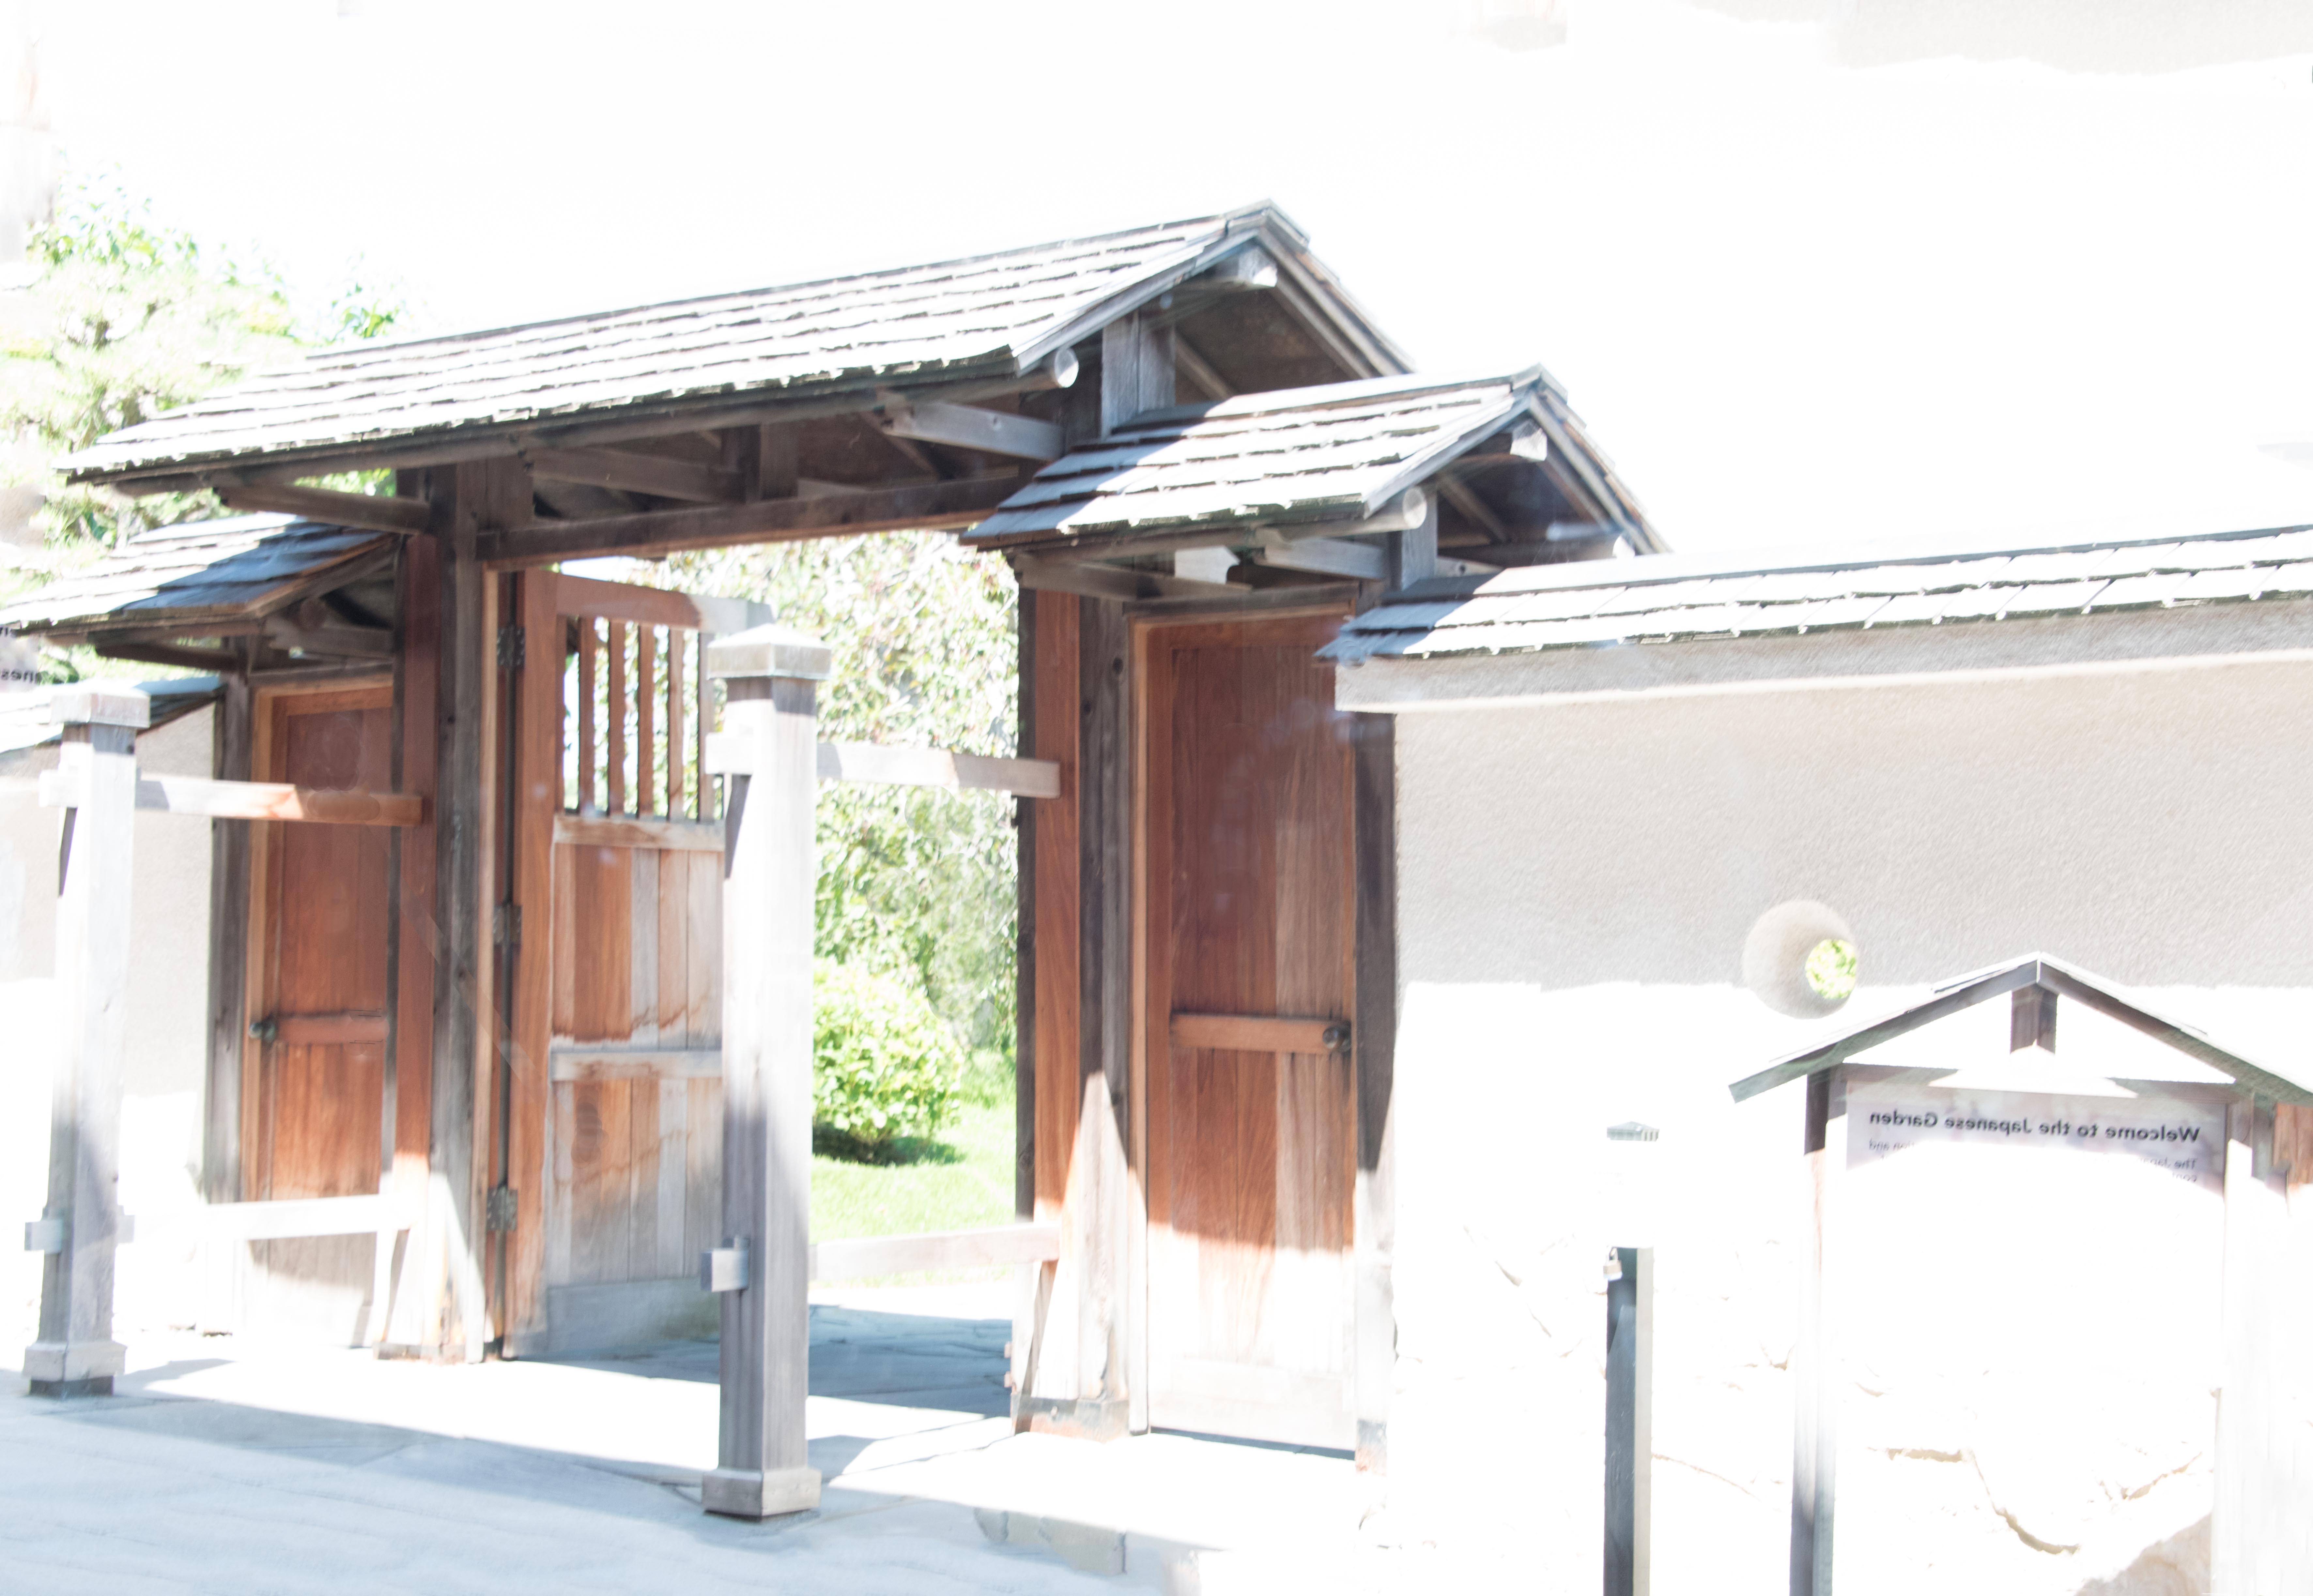
(Japanese Garden 1: F/8; ISO 900; 1/6.)
Oops. I forgot to check the exposure meter; I forgot I was using the manual mode. However, this photo gives me a dreamy feeling, and it looks like a quick sketch, so I kind of like it. I mean… I wish I didn’t make the mistake, but the photo is somewhat interesting to me. (I am weird, I know.)
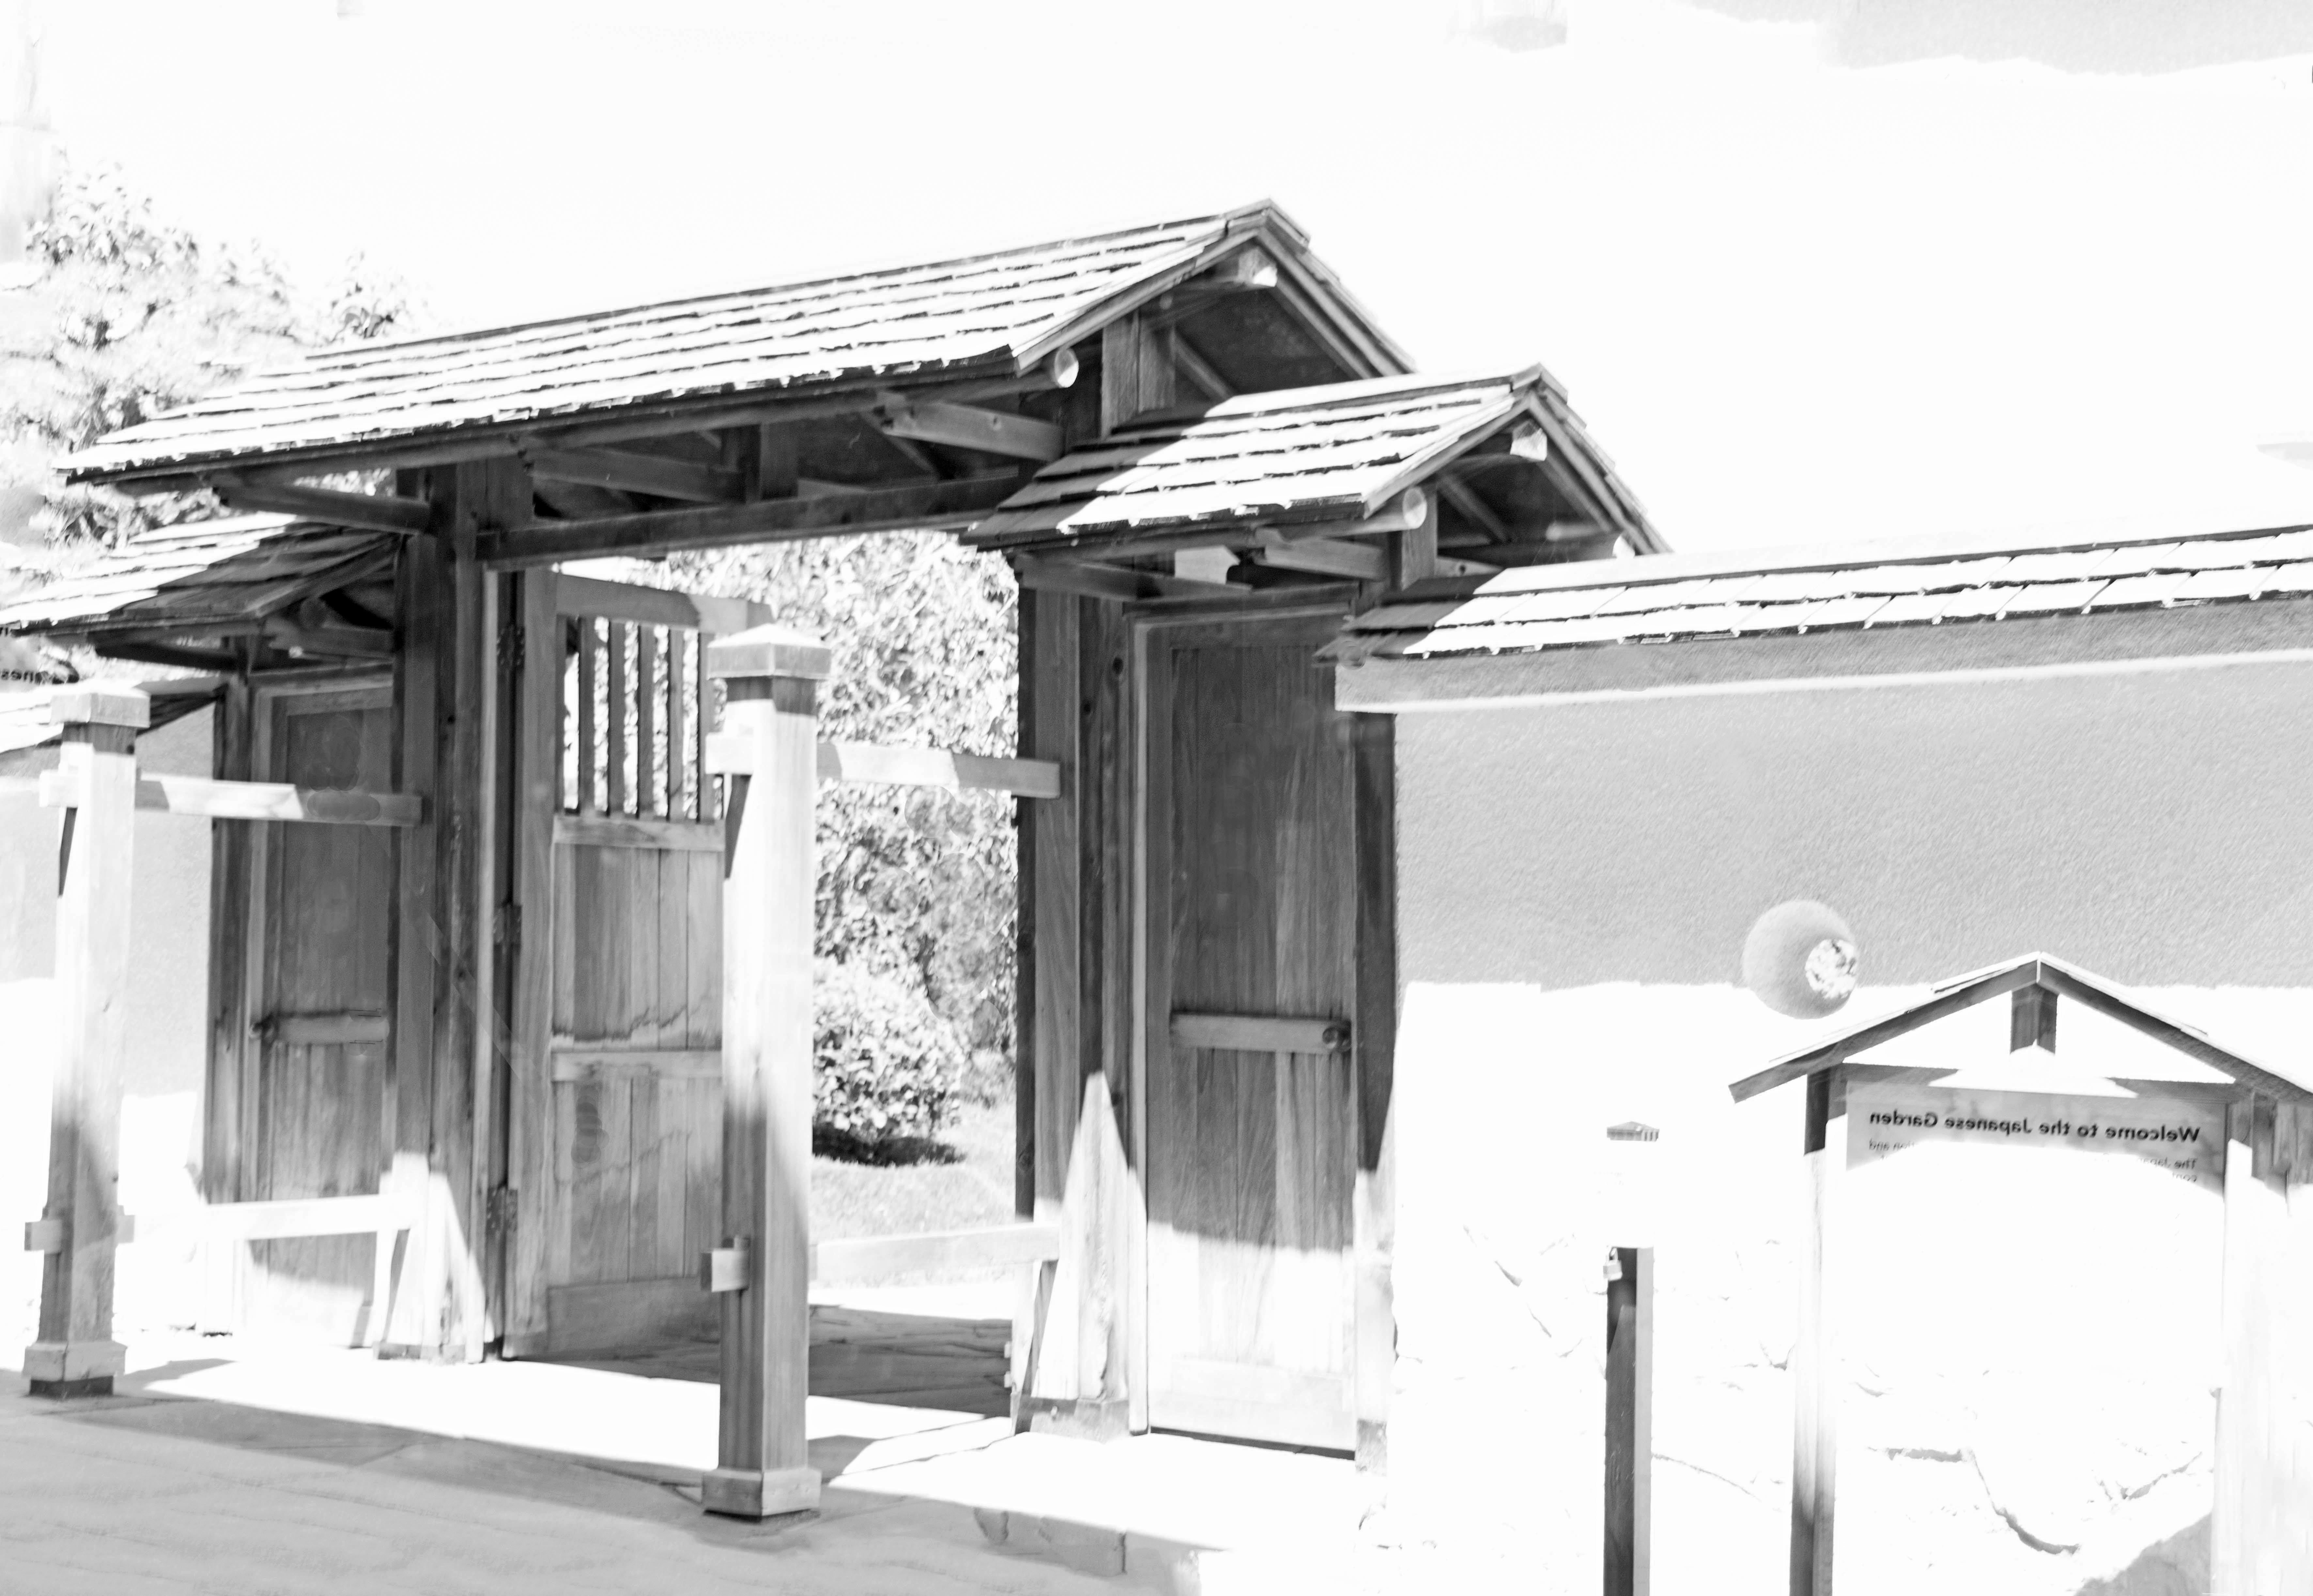
(I am adding a black and white here per Raj’s request. Raj is right. I like the b&w much better.)
Here is a better one.
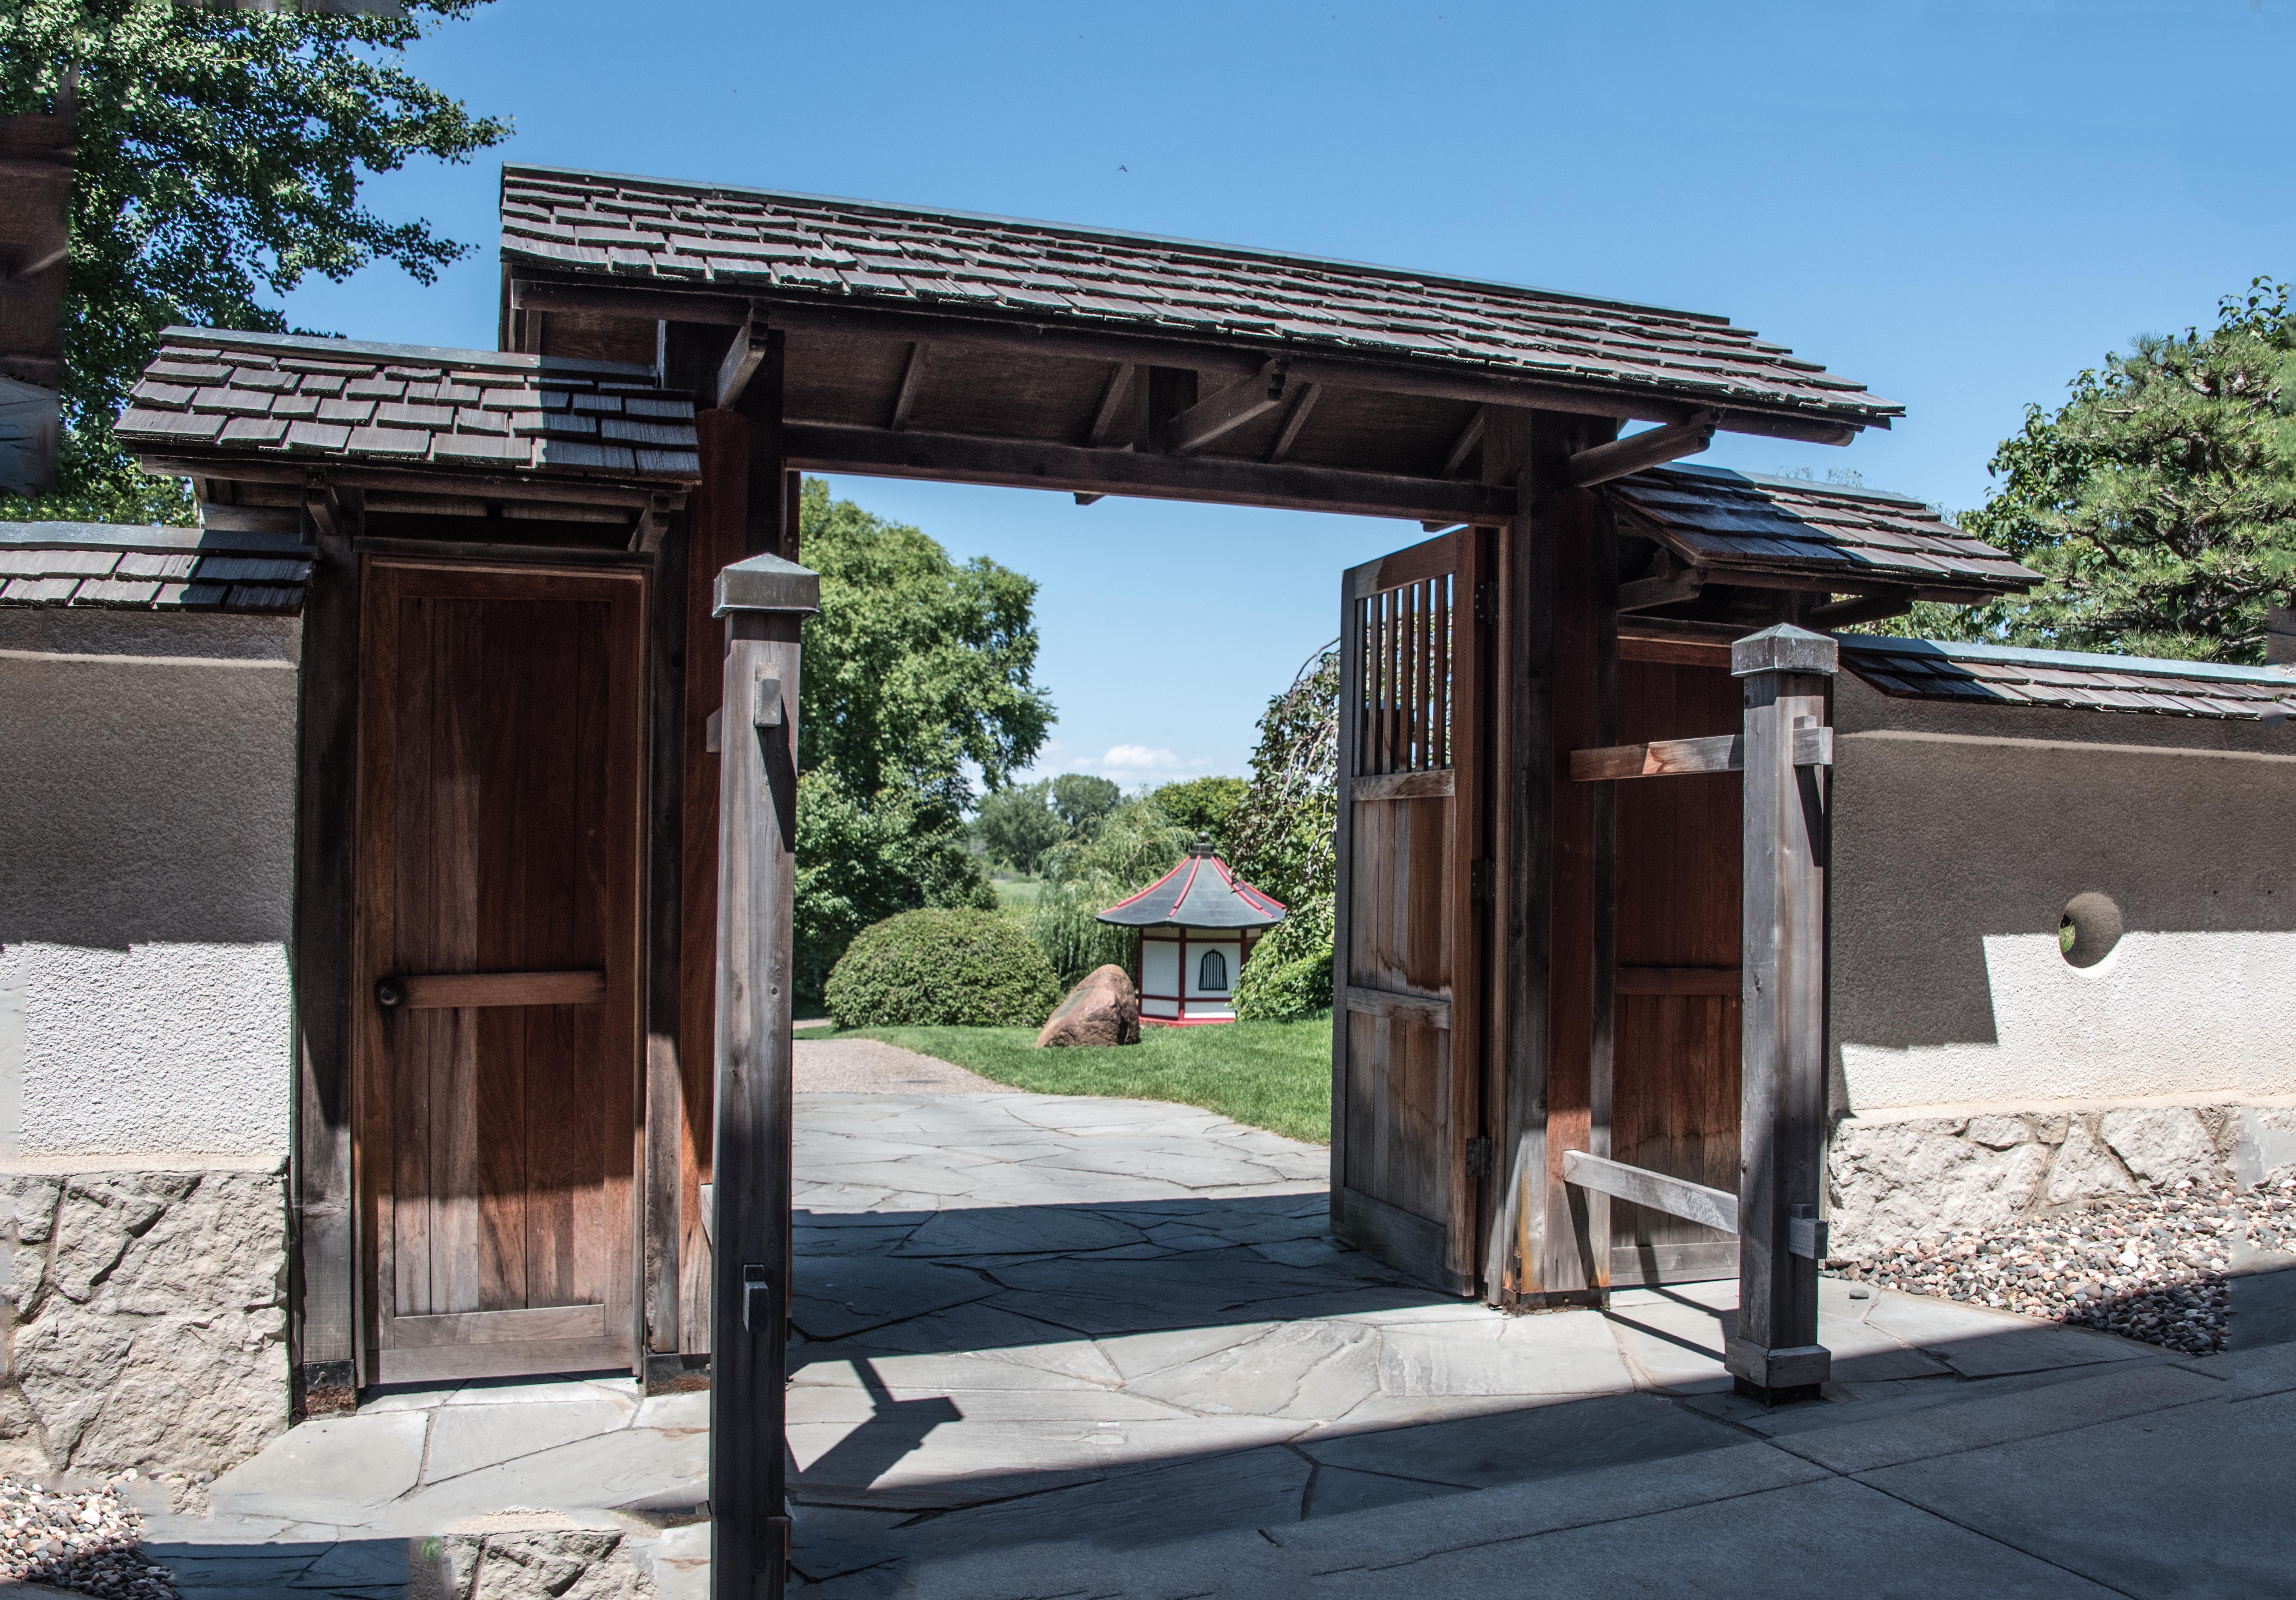
(Japanese Garden 2: F/8; ISO 360; 1/640)

(Walker Art Center Sculpture Garden: F/4; ISO 200; 1/2500)
Now I have a question: Since most of the time we do edit our photos (post-processing), do these original settings (aperture, shutter speed, ISO) really mean anything?
Also, I don’t understand why some of my photos were under exposed (manual mode) even though I was setting the exposure according to the camera meter. (I guess I have to figure this one out myself.)
Thanks for visiting my blog.

You are right to ask about whether original settings mean anything in this age of software for digital photos. My experience has been that unless I start with a photo that’s been properly exposed (shutter speed, aperture, ISO, white balance, focus), it is pretty hard to rescue a photo with post processing. I don’t own or like to use a lot the popular software packages that many of us have, so my choices are quite limited in that regard. I don’t see the point of spending a lot of time struggling with software. If I cannot produce something presentable within a few minutes, I move on to another photo or to something else. Surely we can all use our time better, even if it meant sitting and looking at the scenery, doing nothing.
LikeLiked by 2 people
Great explanation sir… I agree with you totally…Basically its like garbage in garbage out once you have a badly taken picture. Now only edits I do is levels,contrast etc.. nothing more.
LikeLiked by 1 person
Good morning, Hien. Your comment brought back some memories. When I first got serious in photographing (4 years ago?) I wasn’t aware that most of photos I saw had been post-processed. I thought they came out of the camera just like that. I was impressed with some photographers’ work to the point that I, almost, worshiped them 😉 When I found out about post-processing, I felt being cheated (cheated by my stupidity). It took me a while to recover from that.
Now when I look at a photo, most of the time, I treat it as a piece of art. I still enjoy looking at them, but it is different kind of appreciation than what I had before.
I use Photoshop Element – a simple version of Photoshop, and I’m familiar with only 5 commands 😉 I do think software can do a lot of amazing thing. But for my purpose, basic editing is more than enough.
Thanks for your comment. (not sure how to say this… I always admire your work, now I have greater respect to you, the photographer.
Have a great day.
LikeLiked by 1 person
I think the answer is both yes and no. Post processing can do a lot, but it can’t do everything. I use a bridge camera, for a variety of reasons involving speed, cost, convenience, etc., and I sometimes get good sharp pictures, but most of the pictures I know will need refinement (I use Adobe Lightroom, mostly), but you can only do so much. The pictures which are less sharp, and sometimes blurry can only be adjusted so much. On the other hand, there are myriad filters and affects that can make a so-so photograph into a work of art. It really depends on you, how you want the pictures to be and whether you feel you can make the adjustments.
Some time ago I realized that, while a picture is worth a thousand words, not all photographs are pictures in that sense of the word. For the past year I have worked on trying to get to know my camera, my software, and how they interact with each other to try and craft pictures, in the thousand words sense. I figure I’m getting close to a hundred words when I really make an effort.
LikeLiked by 1 person
Well said!!! Every word!!! I agree with you 100%!!!
It took me a while to appreciate post-processing. I had to change how I was thinking on photographing and that took a long while. You were so right that it could do a lot, but it can only do so much. I use Photoshop Element, and, like you, most of my photos needed refinement. If I like the photo so much, but I can’t fix it, I, too, would use a filter to make it a piece of art. Still, I don’t do too much editing. I am comfortable with 5 commands. 😉
It’s interesting to read your comment. We have similar experiences. A year ago (or two? Time goes so fast) I spent some time studying my camera. I went through every setting. After that, I felt the camera is finally mine 😉
I, too, had planned to study more on editing software. We have Lightroom, but I am so use to editing with Photoshop Element and never took time to learn Lightroom. Well, that was the plan a year ago. Now I gave up. I don’t think it will be on the top of my priority list for a while, so I don’t think about it anymore. So little time; so much fun things to do!
Thank you for your comment. Have a wonderful day.
LikeLike
Thanks again for excellent contribution. I really look for your posts the most. I am always interested in what you come up with!..ok now on the feedback
First picture: Beautiful rose with full glory. Drenched in dew and looking so fresh. However it’s not actually showing its beauty to the fullest. You have chosen to show the top view of the flower, but it’s not able to show off itself. I feel the picture should have been taken in good close-up distance, you mentioned about the breathing space, (yes it’s gonna be one of my future lessons) may not be required in this case. Breathing space is required in the case of side view where flower is slanted at a particular side. Since your intent (lesson 1) in this case is ONLY flower, it should get full user interest. Hope you get my point.
Second picture: Yes intended over exposures create great art like pictures. I agree lot of portrait photographers do over expose the models just to give that angel/fairy look. But one thing to note is ever exposure burns the highlights. In the picture you have posted, if you see sky is lost. Details on the wall and the notice board are gone. In this case though I strongly recommend a monochrome image. This way we are not worried about the lost blue sky or details and whole picture becomes a sketch like output highlighting the vertical and horizontal lines. (If possible please convert this pic to b&w and post along with the original, we will be able to compare them)
Third Picture: Perfectly exposed, clearly identifies the intent of the photographer. Just to nitpick 😀 probably you could have moved bit to the right, so that path leading out into those trees could have been captured in the open door space. Shutter speed of 1/6 sec .. wow.. you have a steady pair of hands. Wish I had!
Last picture: Beautiful landscape Main focus being the spoon and the cherry! Very scenic background and it’s an overcast day and your exposure is able to preserve the details on the sky. The lady on the left on the picture is a distraction could have been avoided. Also I feel you could have gone bit low to take the shot, so that the cherry would have the sky as the background. This way viewer first looks at the picture interest directly goes to cherry as that is the main highlight (story) of the picture.
Now to answer your question (glad you asked). Yes it matters, even though you edit the pictures.. (Edits are a MUST) . If picture is taken with wrong settings say you took a shot with f11 for a portrait, no way you are gonna have background blur, or if you shoot a sport action at 1/60 and expect a picture to be perfect… no way one can fix them by post processing. The reason why I wanted to know about it is so that I can give my feedback properly. Ultimately how your picture looks matter. Not the settings! 😀
Regarding the pictures getting under exposed, could you post your picture? There are various reasons to photos to be underexposed even if you are using the camera meter.
Sorry about the long post.. but I had to touch on each of them. ..Thank you once again! Cheers
LikeLiked by 1 person
Thank you, Raj, for your great feedback.
I have to admit that I didn’t give a lot of thought on the rose photo. I wanted a photo with plenty of breathing space and I wanted to post this entry before my next trip which is coming soon, so I was in a little hurry. Something bothered me when I saw it on my blog, but I didn’t have time to investigate. You were right, as always. I cropped it to 5*5 and it looked much better. That brings up another point: it is difficult to know when to apply what. It’s not as easy as one-size-fits-all.
As far as 1/6 seconds – I don’t have steady hands. I was very surprised when I found out it took that long. Maybe I was near the coma-state due to the heat? And… can we trust the metadata? Back-button-shutter-release does help.
Second picture: again, you were right. It looks much better in B&W. I posted it the B&W photo as you suggested. Lesson learned. Thank you.
Third picture: I wrote it wrong. This should be 1/640 second. Somehow I listed it wrong. ;-( It would be nice to see how it looks if I moved bit to the right. Would I have enough space for the pavilion? Is it important to have a good view of that pavilion? A good reason to go back, I guess.
Last picture: I tried to crop that lady out of my photo, but I didn’t like the look. I thought of stamping her out, but that would take more time than I want to spend… so I left her there. We had to take our daughter to the airport that day; I didn’t have time to wait either. ;-(
I agree that I would have a good photo if I went low and use sky for the background for the cherry. But you told us to make our photo unique in lesson one. And I know many people had taken this cherry sculpture that way. In fact, you can buy one like that at the gift shop. So, I purposely placed the cherry next to the cathedral. Cherry next to cathedral – how interesting is that! 😉
I knew why sometime my pictures turned out under exposed now. I love how our subconscious works. The answer came to me effortlessly. 😉 My problem? Well, I forgot that when we use back button as shutter release button, pressing back button will lock only the focus, but not the exposure. In other words, I need to press one extra button if I want to also lock the exposure before recompose my photo.
Thanks again. Have a great day.
LikeLiked by 1 person
Regarding when you need that space, I will have another session on that. Yes it all depends. In rose pic, absolutely if leave no space at all or even crop off the bit of outer petals is fine. But it depends on how good the capture is. When to apply? Depends on your story you are telling.
Second pic looks better. Even you can increase the contrast.
Third picture, if your intention is to show that pavilion, that’s good. Probably you could have positioned in the middle too, only problem I see is part of the path it is showing and its cut off. Moving to the left would have almost made that path not visible and puts the Pavilion in your story.
Next picture, cherry with cathedral, Idea is really good. But If your story is about sweetness of cherry with cathedral, then I feel you should zoom a bit more so that viewers are not distracted with anything else. (lady one the left and some modern buildings on the right). One of the important things to note is, not to put too many items in your picture. Even you could have tried the portrait mode and cover just about the tip of the stem till the edge of the water, yes you would cut the spoon handle. Or you could use landscape mode till the end of handle. (I am just digging more for thoughts; it’s a beautiful picture already!)
Regarding the back button focus, I do that too. But never had any exposure issues.. When you do back button focus you are locking the focus, but when you half press he shutter release, it would calculate the exposure based on the metering you have chosen. Only issue you will have is you have to meter it on some other part of the scene. Then you have to do exposure locking (half press shutter) and recompose and take shot. But that you have to do it whether you use back button or not. Check with your camera if that’s possible. Nikon D750 should do it
LikeLiked by 1 person
Wow, pretty soon we could publish a book 😉
Thanks again. I appreciate your comment.
Third picture: it took me a while to find the place I liked for the pavilion. I really didn’t want to put it in the middle. I should try. In my mind, it wouldn’t look good, but I could be wrong, as always. Also, if I move to the left, it means the opening of the front door would be narrower — I am not sure if I like that either. Is it possible if I get lower, and cut some of the path, it would look better? Now I can’t wait to go back… there are so many things I would like to try.
Cherry and Cathedral: this is a bit ling to reply so I will do it in a new post 😉
Back button focus — you just answered my question (I tried and worked.) It used to be if I half press shutter, I will lock both the focus and exposure, and I can recompose while locking them. Now I switch to back button shutter, my old habit tells me that as long as I press the back button, both focus and exposure would be locked, which is not true. I need to break out from that habit.
Thanks again. Have a wonderful day.
LikeLiked by 1 person
Book .. yeah it looks like.. 😍
Checked the pic again and you are right you may not be able to move to the left as there are some poles which would come on the way to the opening. So this is the best you could do here other than totally avoiding the pavilion and showing the path.
Yes back button focus is a great thing. Even when I first used it I was so confused.
Also check on my thread a contribution area for Amy’s contribution. Did some discussion there too.
LikeLiked by 1 person
Thanks again. You were right… the pole would be a problem. I am still anxious to go back to take another look 😉
Amy takes wonderful photos. I visit her blog often, and will definitely checking on your comments.
Have a great day.
LikeLike
Pingback: Learn Photography – 3 – Exposure – XDrive
You are way ahead of me, Helen! I saved this post to read again (and again) and play with the settings to see what you did. I do not use manual near as much as I should. I need to do like you did–sit down and learn my cameras setting. For me, it has to be fun. But then I am not really learning, but instead, having too much fun, maybe?
LikeLiked by 1 person
Thank you, Lois. Having fun is good, isn’t it? I am older, so you have several years to catch 😉 Seriously, it was only 4 or 5 months ago that I decided to go through all my camera settings. Before that, I just clicked, and I didn’t feel bad about that (just clicking). It wasn’t my time to learn (my excuse 😉
Even now, I struggle for managing my time. I’ve decided not to bother to learn more about post processing. I am okay with my limited editing capabilities 😉 There are so many fun things I want to do. I have to prioritize. I am sure you do too.
Good night.
LikeLiked by 1 person
I, too, was looking forward to seeing your lesson 3. These are great questions, Helen.
Not too long ago, I used Lr to rescue my bad photos, and I had no idea of aperture, ss, iso….
So much to learn from you and Raj! Appreciate the opportunity. 🙂
LikeLiked by 1 person
Thank you, Amy. I just saw your lesson 3 photos. I love them! I think we have taken a little different path in the past. I can’t take those bird photos like you did; I can’t take any of those night photos either; I still don’t know how to use Lr even though we bought the program 3 or 4 years ago and bought a new version early this year. I have a lot to learn in those areas. It’s nice to have a blogger friend like you so I can learn and grow.
One thing I am good at – yes, I don’t mind say so myself 😉 — is asking basic questions. I am slower than most people (I am telling the truth), so quite often I just couldn’t get it at the first time, and have to ask questions. 😉
We are building a deck, finally. I am hoping I could practice taking night photos after it is done 😉
Have a wonderful evening.
LikeLike
Good evening. Appreciate your support, Helen. I think I approach photography through trial and error most of the time, so it has been a long, slow leaning process for me. But, you and my other blog friends have been very patient allowing me to take step at a time (sometimes, one step forward and two steps back). 🙂
I give credit to the my 7D II which is made for action shots.
Nice to have a deck, I don’t use as often as I should due to the TX heat and oak trees. 🙂
LikeLiked by 1 person
Pingback: Learn Photography – Review – July – XDrive